
파일 업로드
개요
- HTML Form을 통해 파일 업로드를 하는 방법에 대해 알아보자.
- 그 전에, 폼 전송의 방식에 대해 이해하고 넘어가자.
HTML 폼 전송 방식
전송 방식의 종류
application/x-www-form-urlencodedmultipart/form-data
application/x-www-form-urlencoded 방식
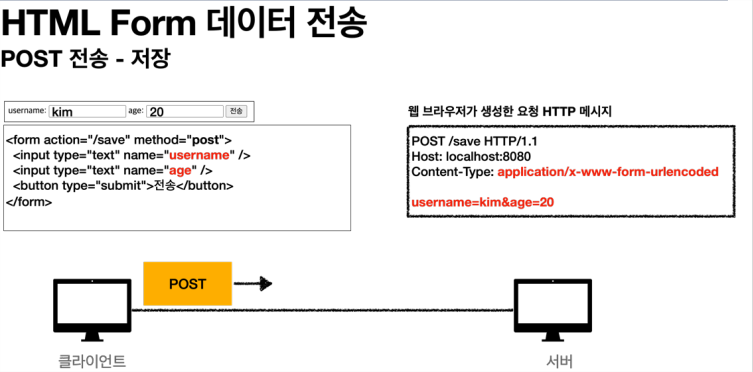
- HTML 폼 데이터를 서버로 전송하는 가장 기본적인 방법이다.
- Form 태그에 별도의
enctype옵션이 없으면, 웹 브라우저는 요청 HTTP 메시지의 헤더에 아래 내용을 추가한다.Content-Type: application/x-www-form-urlencoded
- 이 방식은 문자를 서버에 전송하는 방식이다.
multipart/form-data 방식
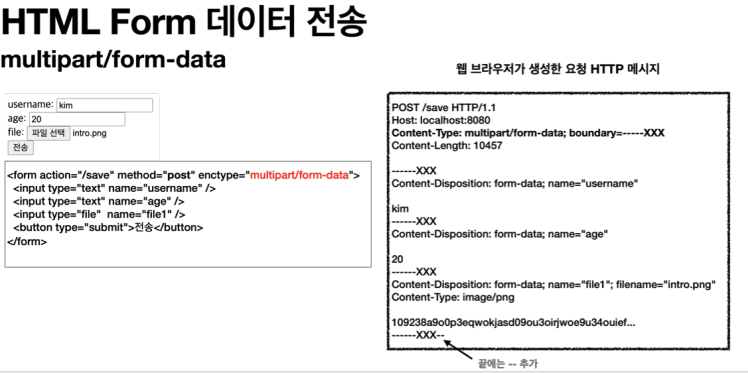
- 이 방식을 사용하려면 Form 태그에
enctype="multipart/form-data"를 지정해야 한다. -
다른 종류의 여러 파일과 폼의 내용을 함께 전송할 수 있다.
그래서 이름이
multipart이다. - 전송 항목 구분자
------XXX
- 폼 데이터 종류
- 폼 일반 데이터
- name (항목속성)
- 문자
- 파일 데이터
- name (항목속성)
- 파일 이름
- Content-Type
- 바이너리 데이터
- 폼 일반 데이터
서블릿 업로드 예시
- 먼저 서블릿을 통해, 업로드 로직을 처리해보자.
업로드 경로 설정: application.properties 파일
file.dir=D:\\Spring\\fileDir\\
- 반드시 설정한 경로에 실제 폴더를 미리 만들어두자.
- 경로 마지막에 \(슬래시)가 붙은 것에 주의하자.
업로드 처리 컨트롤러: ServletUploadController 클래스
import lombok.extern.slf4j.Slf4j;
import org.springframework.beans.factory.annotation.Value;
import org.springframework.stereotype.Controller;
import org.springframework.util.StreamUtils;
import org.springframework.util.StringUtils;
import org.springframework.web.bind.annotation.GetMapping;
import org.springframework.web.bind.annotation.PostMapping;
import org.springframework.web.bind.annotation.RequestMapping;

import javax.servlet.ServletException;
import javax.servlet.http.HttpServletRequest;
import javax.servlet.http.Part;
import java.io.IOException;
import java.io.InputStream;
import java.nio.charset.StandardCharsets;
import java.util.Collection;

@Slf4j
@Controller
@RequestMapping("/servlet")
public class ServletUploadController {

  @Value("${file.dir}")
  private String fileDir;

  @GetMapping("/upload")
  public String newFile() {
    return "upload-form";
  }

  @PostMapping("/upload")
  public String saveFile(HttpServletRequest request) throws ServletException, IOException {
    String itemName = request.getParameter("itemName");
    Collection<Part> parts = request.getParts();

    for (Part part : parts) {
      log.info("==== Part ====");
      log.info("name = {}", part.getName());
      Collection<String> headerNames = part.getHeaderNames();

			for (String headerName : headerNames) {
        log.info("header {}: {}", headerName, part.getHeader(headerName));
      }

      log.info("submittedFileName = {}", part.getSubmittedFileName());
      log.info("size = {}", part.getSize());

      //--------- 데이터 읽기 ------------
      InputStream inputStream = part.getInputStream();
      String body = StreamUtils.copyToString(inputStream, StandardCharsets.UTF_8);
      log.info("body = {}", body);

      //-------- 파일 저장하기 ------------
      if (StringUtils.hasText(part.getSubmittedFileName())) {
        String fulPath = fileDir + part.getSubmittedFileName();
        log.info("파일 저장 fullPath = {}", fulPath);
        part.write(fulPath);
      }

    }

    return "upload-form";
  }
}
- 멀티파트 형식은 전송 데이터를 하나하나 각각 부분(
Part)으로 나누어 전송한다.Collection<Part> parts에는 이렇게 나누어진 데이터가 각각 담긴다.
@Value("${file.dir}") private String fileDir;application.properties에서 설정한file.dir의 값을 주입한다.
- Part 객체의 주요 메서드
part.getSubmittedFileName()- 클라이언트가 전달한 파일명
part.getInputStream()- Part의 전송 데이터를 읽을 수 있다.
part.getWrite(...)- Part를 통해 전송된 데이터를 저장할 수 있다.
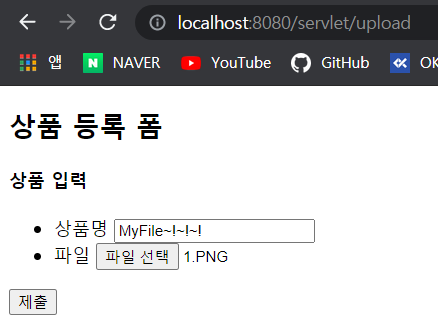
폼 뷰 템플릿: upload-form.html
<!DOCTYPE html>
<html xmlns:th="http://www.thymeleaf.org">
<head>
    <meta charset="UTF-8">
    <title>Title</title>
</head>
<body>

<div class="container">

    <div class="py-5 text-center">
        <h2>상품 등록 폼</h2>
    </div>

    <h4 class="mb-3">상품 입력</h4>

    <form th:action method="post" enctype="multipart/form-data">
        <ul>
            <li>상품명 <input type="text" name="itemName"></li>
            <li>파일 <input type="file" name="file"></li>
        </ul>
        <input type="submit">
    </form>

</div> <!-- /container -->

</body>
</html>
업로드 결과
-
요청
-
결과

-
로그
이하 생략..
설정
업로드 사이즈 제한
application.properties파일을 통해, 업로드 사이즈 설정을 할 수 있다.spring.servlet.multipart.max-file-size- 파일 하나의 최대 사이즈
- 기본 1MB
spring.servlet.multipart.max-request-size- 멀티파트 요청 하나에 여러 파일을 업로드 할 수 있는데, 그 전체 합 사이즈
- 기본 10MB
-
예시
  #파일 한 개당 최대 사이즈 설정
  spring.servlet.multipart.max-file-size=1MB

  #여러 파일의 총 사이즈 설정
  spring.servlet.multipart.max-request-size=10MB
멀티파트 처리 끄기
application.properties파일을 통해, 서버에서 멀티파트 처리를 안하도록 설정할 수 있다.spring.servlet.multipart.enabled- true: 멀티파트 처리 O
- false: 멀티파트 처리 X
-
예시
spring.servlet.multipart.enabled=false
스프링 업로드 예시
- 스프링은
MultipartFile이라는 인터페이스로 멀티파트 파일을 매우 편리하게 지원한다.
업로드 컨트롤러: SpringUploadController 클래스
package example.uploaddownload;

import org.springframework.beans.factory.annotation.Value;
import org.springframework.stereotype.Controller;
import org.springframework.web.bind.annotation.GetMapping;
import org.springframework.web.bind.annotation.PostMapping;
import org.springframework.web.bind.annotation.RequestMapping;
import org.springframework.web.bind.annotation.RequestParam;
import org.springframework.web.multipart.MultipartFile;

import javax.servlet.http.HttpServletRequest;
import java.io.File;
import java.io.IOException;

@Controller
@RequestMapping("/spring")
public class SpringUploadController {

    @Value("${file.dir}")
    private String fileDir;

    @GetMapping("/upload")
    public String newFile() {
        return "upload-form";
    }

    @PostMapping("/upload")
    public String saveFile(@RequestParam String itemName,
                           @RequestParam MultipartFile file,
                           HttpServletRequest request) throws IOException {
        if (!file.isEmpty()) {
            String fullPath = fileDir + file.getOriginalFilename();
            file.transferTo(new File(fullPath)); //파일 저장
        }

        return "upload-form";
    }

}
@RequestParam MultipartFile file- 업로드하는 HTML Form의 name에 맞추어
@RequestParam을 적용하면 된다. @ModelAttribute에서도MultipartFile을 동일하게 사용할 수 있다.
- 업로드하는 HTML Form의 name에 맞추어
- MultipartFile 객체의 주요 메서드
file.getOriginalFilename()- 업로드 파일명 반환
file.transferTo(new File(경로))- 파일 저장
파일 이름 고려사항
- 파일을 업로드할 땐, 파일명에 신경을 써야한다.
- 사용자가 업로드한 파일명, 서버에 저장할 파일명을 구분해야한다.
서버에 저장할 파일명
- 동일한 파일명으로 저장이 되면, 파일이 덮어씌워지기 때문에
UUID등을 이용하여 중복되지 않는 파일명으로 서버에 저장해야한다.
사용자가 업로드한 파일명
- 사용자에게 업로드된 파일의 이름을 보여줄 때는, “사용자가 업로드한 파일명”으로 제공해야한다.
DB에 파일명 저장
- 서버에 어떤 파일이 저장되었는지, 파일명을 DB에서 관리할 필요가 있다.
- DB에 파일 정보를 저장할 때는, “원래 파일명”과 “서버에 저장된 유일한 파일명” 모두 저장해야한다.
파일 자체를 DB에 저장하는 것이 아니다!
파일 다운로드
다운로드 예시
다운로드할 파일: D:\Spring\fileDir\myPhoto.png

다운로드 컨트롤러: SrpingDownloadController 클래스
package example.uploaddownload;

import org.springframework.core.io.Resource;
import org.springframework.core.io.UrlResource;
import org.springframework.http.HttpHeaders;
import org.springframework.http.ResponseEntity;
import org.springframework.stereotype.Controller;
import org.springframework.web.bind.annotation.GetMapping;
import org.springframework.web.bind.annotation.PostMapping;
import org.springframework.web.util.UriUtils;

import java.net.MalformedURLException;
import java.nio.charset.StandardCharsets;

@Controller
public class SpringDownloadController {

  @GetMapping("/download/form")
  public String downloadForm() {
      return "download-form";
  }

  @GetMapping("/download/file")
  public ResponseEntity<Resource> downloadFile() throws MalformedURLException {
    String uploadFileName = "myPhoto.png";
    String fullPath = "D:\\Spring\\fileDir\\" + uploadFileName;
    UrlResource urlResource = new UrlResource("file:" + fullPath);

    //다운로드 할 것임을 헤더에 명시
    String encodedUploadFileName = UriUtils.encode(uploadFileName, StandardCharsets.UTF_8); //한글깨짐 방지
    String contentDisposition = "attachment; filename=\"" +
            encodedUploadFileName + "\"";

		//응답
    return ResponseEntity.ok()
            .header(HttpHeaders.CONTENT_DISPOSITION, contentDisposition)
            .body(urlResource);
  }
}
header(HttpHeaders.CONTENT_DISPOSITION, contentDisposition)- 응답 헤더 설정
Content-Disposition: attachment; filename="myPhoto.png"
- 위와 같이 응답 헤더를 설정하면, 브라우저가 파일을 다운로드할 것임을 알게된다.
- 만약 헤더 설정을 하지 않는다면, 브라우저는 응답을 화면에 출력하라고 이해한다.
- 응답 헤더 설정
body(urlResource)- 응답 바디에 파일이 위치한 경로를 입력한다.
- 해당 경로에 있는 파일을 다운로드하게 된다.
다운로드 뷰 템플릿: download-form.html
<!DOCTYPE html>
<html xmlns:th="http://www.thymeleaf.org">
<head>
    <meta charset="UTF-8">
    <title>Title</title>
</head>
<body>
    <button type="button" th:onclick="|location.href='@{/download/file}'|">파일 다운로드</button>
</body>
</html>
결과

![]()
- 본 게시글은 김영한님의 강의를 토대로 정리한 글입니다.
- 더 자세한 내용을 알고 싶으신 분들이 계신다면, 해당 강의를 수강하시는 것을 추천드립니다.