
개요
스프링부트로 프로젝트를 진행하던 중, Entity 와 DTO 간의 매핑에 대한 고민을 하게 되었다.
여태껏 나는 아래와 같은 방식으로 프로젝트를 진행해왔다.
- Controller 가 클라이언트(Browser)로부터 받은 데이터를 DTO 객체에 담는다.
Argument Resolver가 데이터를 담아, Controller 의 매개변수에 전달해준다.
- Cotroller 가 DTO 객체에 담긴 데이터를 검증하고, 문제가 없다면 Service 에 전달해준다.
- Service 에서 비즈니스 로직을 수행하여, DTO 객체를 Controller 에 다시 전달한다.
DTO -> Entity변환 작업을 하여 비즈니스 로직을 수행하고,Entity -> DTO변환 작업을 다시 하여 만들어진 DTO 객체를 Controller 에 전달한다.
위와 같은 구조로 프로젝트를 진행할 때, 문제가 발생한 지점은 바로 3번이다.
3번에서 DTO -> Entity 과 Entity -> DTO 변환을 할 때, 나는 DTO 클래스의 생성자나 toEntity() 메서드를 사용했다.
예를 들자면, 아래와 같다.
기존에 내가 작성했던 방식
Entity 클래스
@Entity
@NoArgsConstructor
@AllArgsConstructor
@Getter
public class AEntity {
	@Id
	private Long id;
	private String fieldA;
	private String fieldB;
}
아주 기본적인 엔티티 클래스이다.
DTO 클래스
public class ADto {
	@Getter
	@Setter
	@NoArgsConstructor
	@AllArgsConstructor
	public class ARequest {
		private long id;
		private String fieldA;
		private String fieldB;

		//toEntity 메서드를 통해 (ARequest -> Entity) 변환
		public AEntity toEntity() {
			return new AEntity(id, fieldA, fieldB);
		}

	}

	@Getter
	@Setter
	@NoArgsConstructor
	@AllArgsConstructor
	public class AResponse {
		private long id;
		private String fieldA;
		//private String fieldB; 필드B는 보안상 노출시키지 않는다고 가정하자!

		//생성자를 s통해 (Entity -> AResponse) 변환
		public AResponse(AEntity entity) {
			this.id = entity.getId();
			this.fieldA = entity.getFieldA();
		}

	}
}
사담으로, 나는 하나의 엔티티와 연관있는 DTO 클래스들을 하나의 클래스에서 관리하는 것을 선호한다.
그래서 위 코드처럼 클라이언트로부터 전달받은 데이터를 바인딩할 ARequest 스태틱 클래스와 그에 대한 응답을 할 AResponse 스태틱 클래스를 선언했다.
어쨌든 주목해야하는 것은 ARequest.toEntity() 와 AResponse의 생성자 이다.
나는 이런 방식으로 DTO 와 Entity 간의 변환 작업을 수행하고 있다.
Service 클래스
import static ...ADto;

@Service
public MyService {

	public AResponse service(ARequest aRequest) {
		AEntity aEntity = aRequest.toEntity();

		//복잡한 비즈니스 로직...

		return new AResponse(aEntity);
	}

}
그렇다면 어떤 문제가…
이런 방식으로 프로젝트를 진행하다가 겪은 문제점은 아래와 같다.
엔티티의 필드가 많으면 일일히 생성자와 toEntity() 메서드를 작성하기 어렵다!
위 예시에서는 엔티티의 필드 개수가 3개밖에 되지 않는다.
하지만 엔티티의 필드가 30개, 100개라고 해보자.
엔티티는 테이블과 매핑되기 때문에 테이블의 칼럼이 많다면 그와 동일하게 필드 개수가 늘어날 수 밖에 없다.
물론 여러 엔티티가 하나의 테이블과 매핑되도록 할 수 있지만, 그건 논외로 치자.
그렇다면 일일이 그 많은 필드에 대해 생성자나 toEntity() 메서드를 작성할 수 있을까?
생각만 해도 끔찍하다.
나도 약 20여 개의 필드를 갖는 엔티티에 대해 DTO 클래스를 작성하다 힘들어서…
따라서 이러한 문제를 해결하기 위한 방법을 조사하여 설명하고자 한다.
만약 엔티티의 필드가 수정되면 다시 일일이 변경해줘야 한다.
열심히 toEntity() 메서드와 생성자를 작성해서 매핑했다고 해보자.
만약 요구사항이 변경되어 엔티티의 필드가 추가되거나 삭제된다면?
다시 열심히 toEntity() 메서드와 생성자를 수정해야 할 것이다.
그래서 이런 방식에는 분명히 문제가 있어 보인다.
어떻게 해결할까?
MapStruct 라이브러리를 사용하자!
MapStruct 는 내가 겪는 문제를 간편하게 해결할 수 있는 라이브러리이다.
MapStruct 공식 홈페이지 링크: https://mapstruct.org/
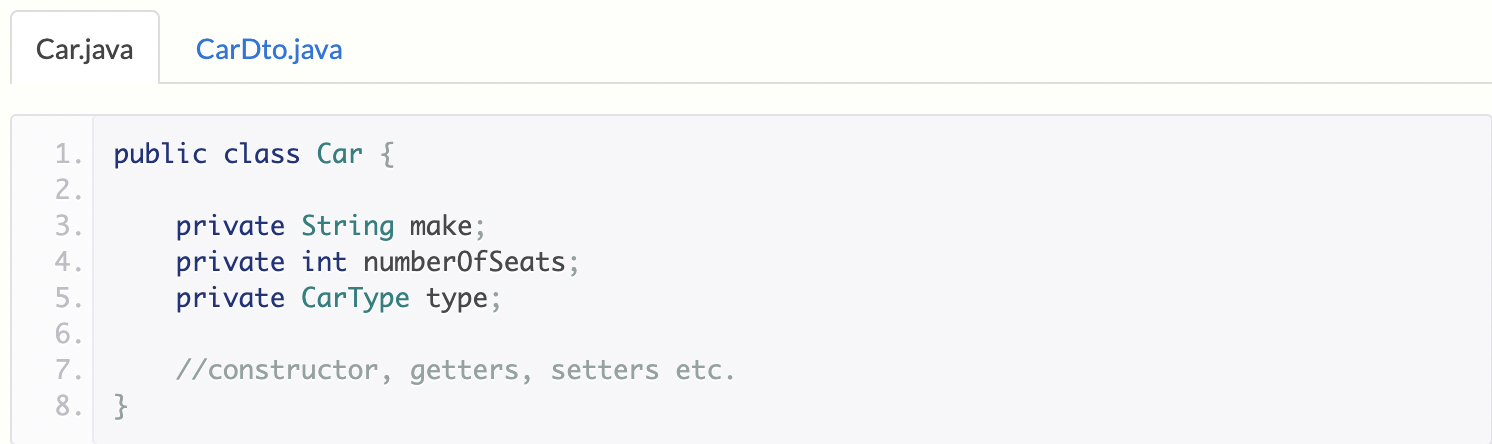
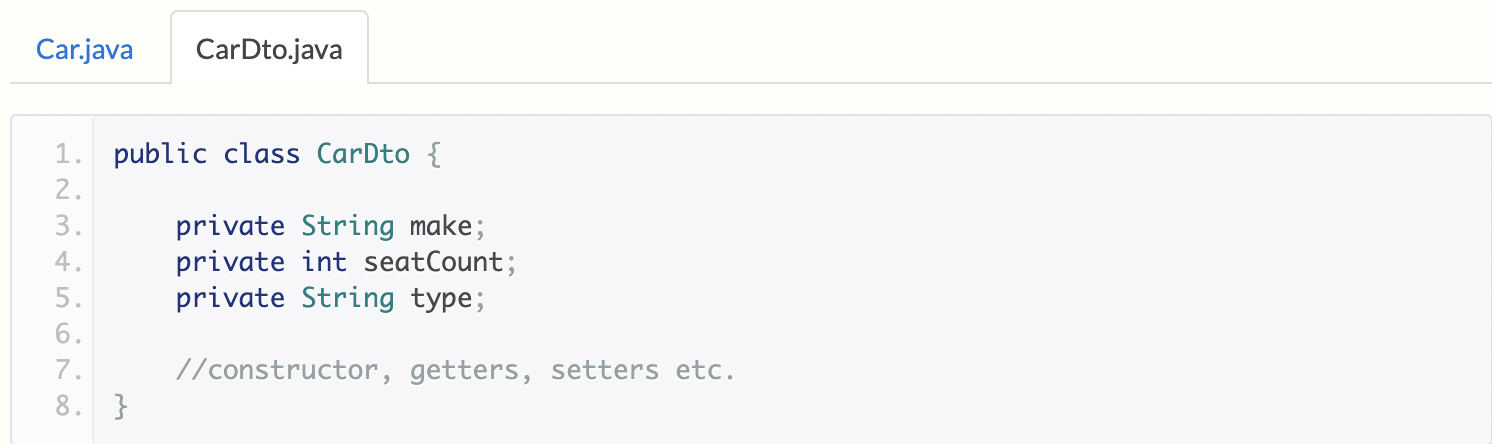
MapStruct 공식 홈페이지에 있는 예시를 가져와봤다.
위처럼 엔티티(Car)와 DTO(CarDto) 클래스가 있다고 해보자.
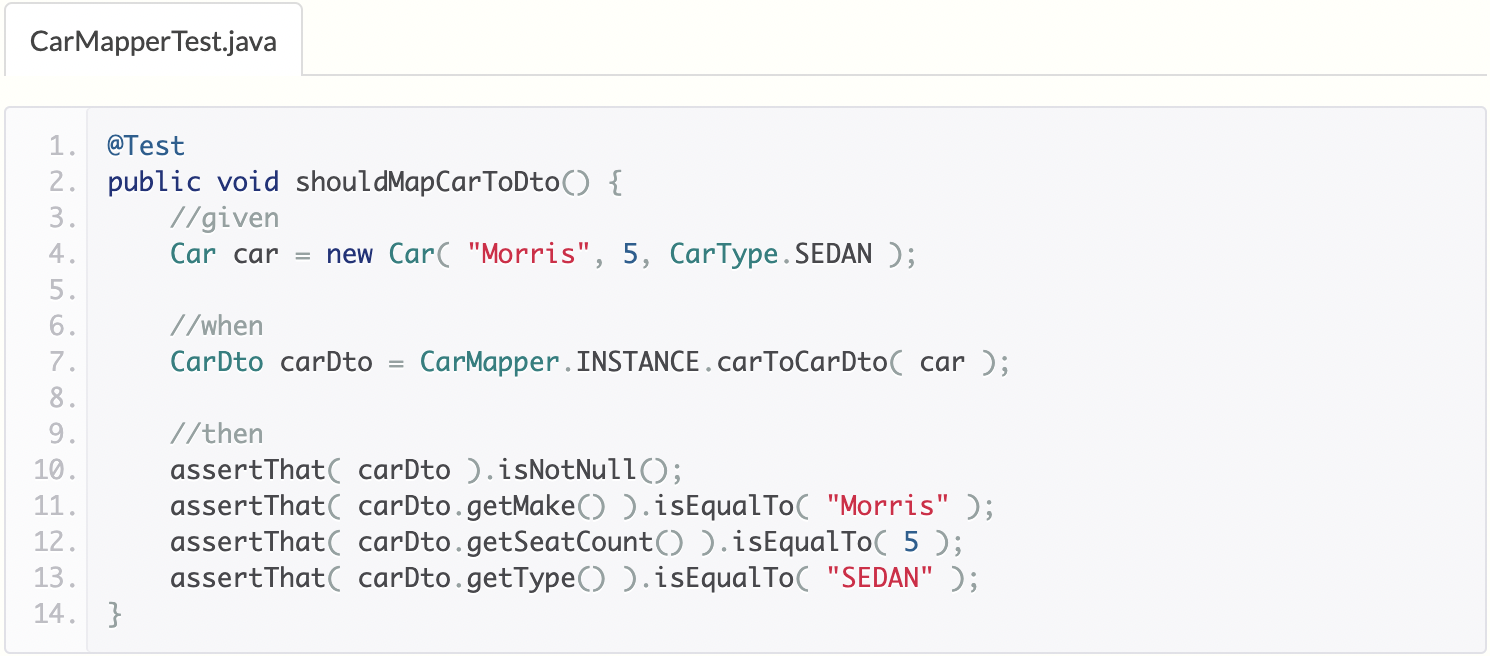
MapStruct 를 사용하여 엔티티 ↔ DTO 매핑을 위한 로직을 작성한다면 아래와 같다.

정말 간단하지 않은가?!
DTO 클래스와 Entity 클래스에 따로 이 둘을 변환(매핑)하는 로직을 직접 구현하지 않았다.
위처럼 인터페이스를 작성하게 되면, 매핑로직이 담겨있는 Instance 가 CarMapper INSTANCE 변수에 담기게 된다.
즉 Mappers.getMapper( CarMapper.class ) 처럼 Mappers 의 메서드 getMapper(...) 메서드를 호출하면, 매핑로직이 담겨있는 Instance 가 반환된다.
테스트코드를 통해, 정말 매핑이 되었는지 확인해보자!
MapStruct 의 특징
간단하게 매핑을 도와주는 MapStruct 는 어떤 특징이 있을까?
아래는 MapStruct 공식 Github 저장소의 README 파일의 일부를 발췌한 것이다.
MapStruct 공식 Github 저장소 링크 : https://github.com/mapstruct/mapstruct
- 리플렉션 대신 일반 메서드 호출을 사용하여 빠르게 동작
- 컴파일 타임 타입 안전성 보장
- 서로 매핑되는 객체나 속성만 매핑할 수 있으므로, 실수로
Order 엔티티를Customer DTO에 매핑하는 등의 일을 방지할 수 있다.
- 서로 매핑되는 객체나 속성만 매핑할 수 있으므로, 실수로
- 독립적인 코드
- 런타임 종속성이 없다.
- 명확한 Error Report. 아래 경우에 대해 예외를 발생시킨다.
- 매핑이 불완전함 (모든 속성이 매핑되지 않음)
- 잘못된 매핑 (적절한 매핑 방법 또는 유형을 찾을 수 없음)
- 쉽게 디버깅할 수 있는 매핑 코드
그럼 본격적으로 MapStruct 를 어떻게 사용하면 되는지 알아보자!
본 글이 상당히 기니, Reference 처럼 참고해도 좋다.
MapStruct 기본 사용방법
build.gradle 설정
implementation 'org.mapstruct:mapstruct:1.5.2.Final'
annotationProcessor 'org.mapstruct:mapstruct-processor:1.5.2.Final'
testAnnotationProcessor 'org.mapstruct:mapstruct-processor:1.5.2.Final'
MapStruct 를 사용하기 전에 build.gradle 파일을 위와 같이 설정하자.
추가적으로 IntelliJ 를 사용하고 있다면 MapStruct 플러그인을 다운로드받아 좀 더 편리하게 사용할 수 있다.
IntelliJ MapStruct Support : https://plugins.jetbrains.com/plugin/10036-mapstruct-support
엔티티와 DTO 클래스 선언
MapStruct 의 사용방법을 설명하기 위한 엔티티 클래스와 DTO 클래스를 선언하겠다.
@Getter
@Setter
@NoArgsConstructor
@AllArgsConstructor
public class Entity {
  private Long id;
  private String fieldA;
  private String fieldB;
}
Entity → DTO 로 변환을 하려면, Entity 에 getter 가 있어야 한다.
반대로 DTO → Entity 로 변환을 하려면, Entity 에 setter 가 있어야 한다.
@Getter
@Setter
@NoArgsConstructor
@AllArgsConstructor
public class BasicDto {
  private long id;
  private String fieldA;
  private String fieldB;
}
DTO → Entity 로 변환을 하려면, DTO 에 getter 가 있어야 한다.
Entity → DTO 로 변환을 하려면, DTO 에 setter 가 있어야 한다.
기본 Mapper Interface
아주 기본적인 Mapper 구현체를 생성하기 위한, 인터페이스를 작성해보자.
@Mapper
public interface BasicMapper {
  BasicMapper INSTANCE = Mappers.getMapper(BasicMapper.class);

  BasicDto toDto(Entity entity);
}
BasicMapper INSTANCE필드- 이 필드는
Mappers.getMapper(HumanMapper.class)으로부터 Mapper 구현체를 응답받아 저장하는 필드이다. - 물론 Interface 에 선언되어 있으니 static 필드이다.
- 이 필드는
BasicDto toDto(Entity entity)메서드- 해당 메서드를 선언함으로써 Mapper 구현체가 이 메서드를 구현하도록 한다.
- Parameter 타입이
Entity이고 반환값이BasicDto이므로, 어떤 객체를 어떤 객체에 매핑해야하는지 알 수 있다. - 즉
Entity→BasicDto로 매핑하는 메서드이다.
위와 같이 Mapper Interface 를 작성하면, MapStruct 가 해당 Interface 를 구현하는 MapperImpl 클래스를 생성해준다.
MapStruct 는 Annotation Processor 를 사용하여, 컴파일 시점에 구현 클래스 코드를 자동으로 생성한다.
우리가 사용하는 Lombok 과 동일한 방식으로 코드를 생성해준다!
Annotation Processor 에 대한 보다 자세한 내용은 https://roadj.tistory.com/9 을 참고해도 좋을 것 같다.
Mapper 실행
아래 테스트코드를 통해, Mapper 를 실행해보자.
@Test
@DisplayName("기본 매퍼 사용")
void useBasicMapper() {
  //GIVEN
  Entity entity = new Entity(1L, "fieldA Value", "fieldB Value");

  //WHEN
  BasicDto dto = BasicMapper.INSTANCE.toDto(entity);

  //THEN
  assertAll(
      () -> assertSame(entity.getId(), dto.getId()),
      () -> assertEquals(entity.getFieldA(), dto.getFieldA()),
      () -> assertEquals(entity.getFieldB(), dto.getFieldB())
  );
}
정상적으로 테스트를 통과한다!
이렇게 너무나도 간단하게 매핑을 할 수 있다니…
놀랍지 않은가?
생성된 Mapper Impl 클래스 코드
MapStruct 가 생성해준 BasicMapper 인터페이스의 구현체는 아래와 같다.
public class BasicMapperImpl implements BasicMapper {

  @Override
  public BasicDto toDto(Entity entity) {
    if ( entity == null ) {
      return null;
    }

    BasicDto basicDto = new BasicDto();

    if ( entity.getId() != null ) {
      basicDto.setId( entity.getId() );
    }
    basicDto.setFieldA( entity.getFieldA() );
    basicDto.setFieldB( entity.getFieldB() );

    return basicDto;
  }
}
Annotation Processor 를 통해, 컴파일 시점에 위와 같은 코드를 생성해준다.
그럼 좀 더 복잡한 매핑을 수행해보자!
엔티티와 DTO 의 필드명이 다른 경우에는 어떻게 매핑할까?
우리가 위에서 작성한 엔티티 클래스와 DTO 클래스는 모두 필드명이 서로 동일했다.
이번에는 필드명이 서로 다를 때, 매핑을 해보자.
매핑할 엔티티와 필드명이 서로 다른 DTO 클래스
엔티티 클래스는 그대로 두고, 새로운 DTO 클래스를 만들어 기존의 필드명을 수정하겠다.
@Getter
@Setter
@NoArgsConstructor
@AllArgsConstructor
public class DiffFieldNameDto {
  private long id;
  private String newFieldA; //매핑할 엔티티의 필드명은 fieldA
  private String newFieldB; //매핑할 엔티티의 필드명은 fieldB
}
서로 다른 필드를 매핑하는 Mapper Interface
이를 위한 인터페이스는 아래와 같다.
@Mapper
public interface DiffFieldNameMapper {
  DiffFieldNameMapper INSTANCE = Mappers.getMapper(DiffFieldNameMapper.class);

  @Mapping(target = "newFieldA", source = "fieldA")
  @Mapping(target = "newFieldB", source = "fieldB")
  DiffFieldNameDto toDto(Entity entity);
}
@Mapping애너테이션- 이 애너테이션을 통해, 각 필드들이 어떻게 매핑되어야 하는지 설정할 수 있다.
target속성을 통해 변환되어야 하는 필드명을 지정할 수 있고,source속성을 통해 변환할 필드명을 지정할 수 있다.target: Return 할 타입의 필드명source: Parameter 타입의 필드명
Mapper 실행
역시 테스트코드를 통해, 결과를 확인해보자!
@Test
@DisplayName("DTO 와 엔티티의 필드명이 다른 경우")
	void differentFieldName() {
	//GIVEN
	Entity entity = new Entity(1L, "fieldA Value", "fieldB Value");

	//WHEN
	DiffFieldNameDto dto = DiffFieldNameMapper.INSTANCE.toDto(entity);

	//THEN
	assertAll(
	    () -> assertSame(entity.getId(), dto.getId()),
	    () -> assertEquals(entity.getFieldA(), dto.getNewFieldA()),
	    () -> assertEquals(entity.getFieldB(), dto.getNewFieldB())
);
}
정상적으로 동작하는 것을 확인할 수 있다.
생성된 Mapper Impl 클래스 코드
@Mapping 애너테이션을 사용해서 인터페이스를 작성한 결과로 아래와 같은 구현 클래스가 생성된다.
public class DiffFieldNameMapperImpl implements DiffFieldNameMapper {

  @Override
  public DiffFieldNameDto toDto(Entity entity) {
    if ( entity == null ) {
      return null;
    }

    DiffFieldNameDto diffFieldNameDto = new DiffFieldNameDto();

    diffFieldNameDto.setNewFieldA( entity.getFieldA() );
    diffFieldNameDto.setNewFieldB( entity.getFieldB() );
    if ( entity.getId() != null ) {
      diffFieldNameDto.setId( entity.getId() );
    }

    return diffFieldNameDto;
  }
}
하나의 DTO 에 여러 Entity 로 매핑하기
개발을 하다보면, 한 DTO 에 여러 Entity 의 속성이 필요한 경우가 있다.
이번에는 하나의 DTO 에 여러 Entity 를 매핑해보자.
새로운 엔티티 클래스
먼저 새 엔티티 클래스를 작성하겠다.
@Getter
@Setter
@NoArgsConstructor
@AllArgsConstructor
public class OtherEntity {
  private Long id;
  private String fieldA;
  private String fieldB;
}
위 엔티티 클래스는 기존의 Entity 클래스와는 다른 클래스이다.
매핑할 엔티티가 2개인 DTO 클래스
Entity 엔티티 클래스와 OtherEntity 엔티티 클래스 2개와 매핑되어야 하는 새로운 DTO 클래스를 작성하자.
@Getter
@Setter
@NoArgsConstructor
@AllArgsConstructor
public class MultiEntityDto {
  private String fieldA; //Entity 클래스의 fieldA 와 매핑
  private String fieldB; //Entity 클래스의 fieldB 와 매핑
  private String otherFieldA; //OtherEntity 클래스의 fieldA 와 매핑
  private String otherFieldB; //OtherEntity 클래스의 fieldB 와 매핑
}
여러 엔티티와 매핑하는 Mapper Interface
아래처럼 Interface 를 작성하면 된다.
@Mapper
public interface MultiEntityMapper {
  MultiEntityMapper INSTANCE = Mappers.getMapper(MultiEntityMapper.class);

  @Mapping(target = "fieldA", source = "entityA.fieldA")
  @Mapping(target = "fieldB", source = "entityA.fieldB")
  @Mapping(target = "otherFieldA", source = "entityB.fieldA")
  @Mapping(target = "otherFieldB", source = "entityB.fieldB")
  MultiEntityDto toDto(Entity entityA, OtherEntity entityB);
}
@Mapping애너테이션의target속성을 사용해서 return 될 클래스의 필드를 지정한다.@Mapping애너테이션의source속성을 사용해서 원 클래스의 필드를 지정한다.- 이때 Parameter 이름을 사용한다.
Mapper 실행
테스트코드를 통해 실행해보자.
@Test
@DisplayName("한 DTO에 여러 엔티티를 매핑하는 경우")
void multiEntity() {
  //GIVEN
  Entity entityA = new Entity(1L, "entityA.fieldA Value", "entityA.fieldB Value");
  OtherEntity entityB = new OtherEntity(1L, "entityB.fieldA Value", "entityB.fieldB Value");

  //WHEN
  MultiEntityDto dto = MultiEntityMapper.INSTANCE.toDto(entityA, entityB);

  //THEN
  assertAll(
      () -> assertEquals(entityA.getFieldA(), dto.getFieldA()),
      () -> assertEquals(entityA.getFieldB(), dto.getFieldB()),
      () -> assertEquals(entityB.getFieldA(), dto.getOtherFieldA()),
      () -> assertEquals(entityB.getFieldB(), dto.getOtherFieldB())
  );
}
테스트가 성공적으로 통과된다.
한 DTO 객체를 만들기 위해, 매핑할 엔티티가 2개 보다 많더라도 이렇게 매핑하면 된다.
물론 반대로 엔티티를 만들 때도 상관없다.
생성된 Mapper Impl 클래스 코드
public class MultiEntityMapperImpl implements MultiEntityMapper {

  @Override
  public MultiEntityDto toDto(Entity entityA, OtherEntity entityB) {
    if ( entityA == null && entityB == null ) {
      return null;
    }

    MultiEntityDto multiEntityDto = new MultiEntityDto();

    if ( entityA != null ) {
      multiEntityDto.setFieldA( entityA.getFieldA() );
      multiEntityDto.setFieldB( entityA.getFieldB() );
    }
    if ( entityB != null ) {
      multiEntityDto.setOtherFieldA( entityB.getFieldA() );
      multiEntityDto.setOtherFieldB( entityB.getFieldB() );
    }

    return multiEntityDto;
  }
}
int 등의 기본 타입이 아닌 경우
우리가 작성한 대부분의 엔티티에는 int 나 String 과 같은 단순한 타입의 필드만 있지는 않다.
다른 엔티티와의 연관관계를 맺어, 다른 엔티티 타입의 필드가 존재하는 경우에 어떻게 매핑해야 하는지 알아보자.
다른 엔티티 타입을 필드로 갖는 엔티티
아래와 같이 새로운 엔티티를 작성하자.
@Getter
@Setter
@NoArgsConstructor
@AllArgsConstructor
public class DependentOtherEntity {
  private Long id;
  private String fieldA;
  private Entity entity; //ManyToOne 관계
  private List<OtherEntity> otherEntityList; //OneToMany 관계
}
DependentOtherEntity 엔티티는 Entity 엔티티와 다대일 관계를 갖는다.
또한 OtherEntity 엔티티와는 일대다 관계를 갖는다.
여기서 사용한
Entity엔티티와OtherEntity엔티티는 위에서 사용한 것과 동일한 것이다.
의존하는 엔티티의 DTO 클래스
DependentOtherEntity 엔티티가 의존하는 다른 엔티티 Entity , OtherEntity 모두 DTO 클래스가 있어야 한다.
@Getter
@Setter
@NoArgsConstructor
@AllArgsConstructor
public class EntityDto {
  private long id;
  private String fieldA;
  private String fieldB;
}
@Getter
@Setter
@NoArgsConstructor
@AllArgsConstructor
public class OtherEntityDto {
  private long id;
  private String fieldA;
  private String fieldB;
}
의존하는 엔티티의 Mapper Interface
바로 위에서 의존하는 엔티티들의 DTO 클래스를 작성했다.
하지만 이것만으로는 부족하고, Mapper Interface 까지 작성해야 한다.
@Mapper
public interface EntityMapper {
  EntityMapper INSTANCE = Mappers.getMapper(EntityMapper.class);

  EntityDto toDto(Entity entity);
}
@Mapper
public interface OtherEntityMapper {
  OtherEntityMapper INSTANCE = Mappers.getMapper(OtherEntityMapper.class);

  OtherEntityDto toDto(OtherEntity entity);
}
다른 엔티티 타입을 필드로 갖는 DTO 클래스
이제 DependentOtherEntity 를 위한 DTO 클래스를 작성해보자.
@Getter
@Setter
@NoArgsConstructor
@AllArgsConstructor
public class DependentOtherDto {
  private String fieldA;
  private EntityDto entityDto;
  private List<OtherEntityDto> otherEntityDtoList;
}
다른 엔티티 타입까지 매핑하는 Mapper Interface
모든 준비는 끝났다!
바로 DependentOtherEntity 를 위한 Mapper Interface 를 작성해보자.
@Mapper(uses = {EntityMapper.class, OtherEntityMapper.class})
public interface DependentOtherMapper {
  DependentOtherMapper INSTANCE = Mappers.getMapper(DependentOtherMapper.class);

  @Mapping(target = "entityDto", source = "dependentEntity.entity")
  @Mapping(target = "otherEntityDtoList", source = "dependentEntity.otherEntityList")
  DependentOtherDto toDto(DependentOtherEntity dependentEntity);
}
@Mapper애너테이션의uses속성을 통해, (의존하는 엔티티→DTO)로 변환해줄 Mapper 들을 설정해야 한다.- 그러면
@Mapping(target = "entityDto", source = "dependentEntity.entity")와 같이, target 과 source 가 서로 다른 타입이더라도 매핑할 수 있다.- target 과 source 간의 Mapper 가 필요한데, 이것을
@Mapper의uses속성에 작성하는 것이다.
- target 과 source 간의 Mapper 가 필요한데, 이것을
Mapper 실행
@Test
@DisplayName("다른 엔티티를 의존하는 엔티티를 매핑하는 경우")
void dependentEntity() {
  //GIVEN
  Entity entityA = new Entity(1L, "entityA.fieldA Value", "entityA.fieldB Value");
  OtherEntity entityB1 = new OtherEntity(1L, "entityB1.fieldA Value", "entityB1.fieldB Value");
  OtherEntity entityB2 = new OtherEntity(2L, "entityB2.fieldA Value", "entityB2.fieldB Value");
  List<OtherEntity> otherEntityList = new ArrayList<>();
  otherEntityList.add(entityB1);
  otherEntityList.add(entityB2);

  DependentOtherEntity dependentOtherEntity = new DependentOtherEntity(
      1L,
      "dependentOtherEntity.fieldA Value",
      entityA,
      otherEntityList
  );

  //WHEN
  DependentOtherDto dto = DependentOtherMapper.INSTANCE.toDto(dependentOtherEntity);
  EntityDto entityADto = dto.getEntityDto();
  List<OtherEntityDto> entityBDtoList = dto.getOtherEntityDtoList();
  OtherEntityDto entityB1Dto = entityBDtoList.get(0);
  OtherEntityDto entityB2Dto = entityBDtoList.get(1);

  //THEN
  assertAll(
      () -> assertEquals(entityA.getFieldA(), entityADto.getFieldA()),
      () -> assertEquals(entityA.getFieldB(), entityADto.getFieldB()),
      () -> assertEquals(entityB1.getFieldA(), entityB1Dto.getFieldA()),
      () -> assertEquals(entityB1.getFieldB(), entityB1Dto.getFieldB()),
      () -> assertEquals(entityB2.getFieldA(), entityB2Dto.getFieldA()),
      () -> assertEquals(entityB2.getFieldB(), entityB2Dto.getFieldB())
  );
}
역시나 정상적으로 동작한다.
생성된 Mapper Impl 클래스 코드
public class DependentOtherMapperImpl implements DependentOtherMapper {

  private final EntityMapper entityMapper = EntityMapper.INSTANCE;
  private final OtherEntityMapper otherEntityMapper = OtherEntityMapper.INSTANCE;

  @Override
  public DependentOtherDto toDto(DependentOtherEntity dependentEntity) {
    if ( dependentEntity == null ) {
      return null;
    }

    DependentOtherDto dependentOtherDto = new DependentOtherDto();

    dependentOtherDto.setEntityDto( entityMapper.toDto( dependentEntity.getEntity() ) );
    dependentOtherDto.setOtherEntityDtoList( otherEntityListToOtherEntityDtoList( dependentEntity.getOtherEntityList() ) );
    dependentOtherDto.setFieldA( dependentEntity.getFieldA() );

    return dependentOtherDto;
  }

  protected List<OtherEntityDto> otherEntityListToOtherEntityDtoList(List<OtherEntity> list) {
    if ( list == null ) {
      return null;
    }

    List<OtherEntityDto> list1 = new ArrayList<OtherEntityDto>( list.size() );
    for ( OtherEntity otherEntity : list ) {
      list1.add( otherEntityMapper.toDto( otherEntity ) );
    }

    return list1;
  }
}
List 타입 필드를 처리하기 위한 메서드까지 생성된 것을 확인할 수 있다.
기존의 객체 업데이트하기
지금까지 우리가 다룬 내용은 모두 새로운 객체(DTO)를 생성해서 거기에 값을 매핑하는 방법이다.
물론 Entity → DTO 말고도, DTO → Entity 로 매핑할 때도 지금까지의 동일한 방법을 사용하면 된다.
보통 DTO → Entity 로 매핑하는 경우는, DTO 를 통해 새로운 Entity 를 생성해서 저장할 때이다.
이번에는 기존에 있던 객체에 값을 매핑하여 업데이트하는 방법에 대해 알아보자.
보통 기존의 객체를 업데이트하는 경우는 Entity 를 업데이트하는 경우일테니, 해당 케이스로 설명하겠다.
기존 엔티티 업데이트 Mapper Interface
바로 위에서 사용한 DependentOtherEntity 와 관련 엔티티, DTO, Mapper 모두 그대로 사용하여 설명하겠다.
다소 복잡하게 느껴질 수 있으나, 그리 어렵지 않다!
바로 Mapper Interface 를 작성해보자.
@Mapper
public interface EntityUpdateMapper {
  EntityUpdateMapper INSTANCE = Mappers.getMapper(EntityUpdateMapper.class);

  @Mapping(target = "entity", source = "dto.entityDto")
  @Mapping(target = "otherEntityList", source = "dto.otherEntityDtoList")
  void updateEntity(DependentOtherDto dto, @MappingTarget DependentOtherEntity oldEntity);
}
updateEntity(..)메서드는 기존의 객체를 업데이트하는 메서드이므로, 반환값이void형이다.@MappingTarget애너테이션을 통해, 어떤 객체에 값이 들어갈지 결정할 수 있다.- 우리의 경우, 엔티티를 업데이트하기로 했으므로
DependentOtherEntity파라미터를 지정했다.
- 우리의 경우, 엔티티를 업데이트하기로 했으므로
- 기존과는 다르게
@Mapping애너테이션의target과source속성의 값이 변경되었다.- 값을 넣을 곳이
DependentOtherEntity이므로,target속성 값은DependentOtherEntity의 필드명(entity,otherEntityList)이 된다. DependentOtherDto로부터 값을 전달받을 것이므로,source속성 값은DependentOtherDto의 필드명(entityDto,otherEntityDtoList)이 된다.
파라미터명.은 붙여도 되고, 생략해도 된다.
- 값을 넣을 곳이
Mapper 실행
Mapper 를 실행시켜 결과를 확인하자.
@Test
@DisplayName("기존 엔티티 업데이트")
void updateEntity() {
  //GIVEN
  /* 기존 엔티티 */
  DependentOtherEntity existedEntity = new DependentOtherEntity(
      1L,
      "old fieldA Value",
      new Entity(1L, "", ""),
      new ArrayList<>()
  );

  List<OtherEntityDto> otherEntityList = new ArrayList<>();
  otherEntityList.add(new OtherEntityDto(1L, "new value", "new value"));
  otherEntityList.add(new OtherEntityDto(2L, "new value", "new value"));
  /* 새로운 데이터(DTO) */
  DependentOtherDto newDto = new DependentOtherDto(
      "new fieldA value",
      new EntityDto(5L, "new value", "new value"),
      otherEntityList
  );

  //WHEN
  EntityUpdateMapper.INSTANCE.updateEntity(newDto, existedEntity);

  //THEN
  assertAll(
      () -> assertEquals(newDto.getFieldA(), existedEntity.getFieldA()),
      () -> assertEquals(newDto.getEntityDto().getId(), existedEntity.getEntity().getId()),
      () -> assertSame(2, existedEntity.getOtherEntityList().size())
  );
}
역시 정상적으로 동작한다.
생성된 Mapper Impl 클래스 코드
public class EntityUpdateMapperImpl implements EntityUpdateMapper {

    @Override
    public void updateEntity(DependentOtherDto dto, DependentOtherEntity oldEntity) {
        if ( dto == null ) {
            return;
        }

        if ( dto.getEntityDto() != null ) {
            if ( oldEntity.getEntity() == null ) {
                oldEntity.setEntity( new Entity() );
            }
            entityDtoToEntity( dto.getEntityDto(), oldEntity.getEntity() );
        }
        else {
            oldEntity.setEntity( null );
        }
        if ( oldEntity.getOtherEntityList() != null ) {
            List<OtherEntity> list = otherEntityDtoListToOtherEntityList( dto.getOtherEntityDtoList() );
            if ( list != null ) {
                oldEntity.getOtherEntityList().clear();
                oldEntity.getOtherEntityList().addAll( list );
            }
            else {
                oldEntity.setOtherEntityList( null );
            }
        }
        else {
            List<OtherEntity> list = otherEntityDtoListToOtherEntityList( dto.getOtherEntityDtoList() );
            if ( list != null ) {
                oldEntity.setOtherEntityList( list );
            }
        }
        oldEntity.setFieldA( dto.getFieldA() );
    }

    protected void entityDtoToEntity(EntityDto entityDto, Entity mappingTarget) {
        if ( entityDto == null ) {
            return;
        }

        mappingTarget.setId( entityDto.getId() );
        mappingTarget.setFieldA( entityDto.getFieldA() );
        mappingTarget.setFieldB( entityDto.getFieldB() );
    }

    protected OtherEntity otherEntityDtoToOtherEntity(OtherEntityDto otherEntityDto) {
        if ( otherEntityDto == null ) {
            return null;
        }

        OtherEntity otherEntity = new OtherEntity();

        otherEntity.setId( otherEntityDto.getId() );
        otherEntity.setFieldA( otherEntityDto.getFieldA() );
        otherEntity.setFieldB( otherEntityDto.getFieldB() );

        return otherEntity;
    }

    protected List<OtherEntity> otherEntityDtoListToOtherEntityList(List<OtherEntityDto> list) {
        if ( list == null ) {
            return null;
        }

        List<OtherEntity> list1 = new ArrayList<OtherEntity>( list.size() );
        for ( OtherEntityDto otherEntityDto : list ) {
            list1.add( otherEntityDtoToOtherEntity( otherEntityDto ) );
        }

        return list1;
    }
}
생성된 MapperImpl 을 스프링 빈으로 등록하기
지금까지 우리는 MapStruct 가 생성해준 Mapper Impl 구체 클래스를 Mappers.getMapper(..) 로 전달받았다.
@Mapper
public interface BasicMapper {
	//이 부분!
  BasicMapper INSTANCE = Mappers.getMapper(BasicMapper.class);

  BasicDto toDto(Entity entity);
}
Spring 를 사용하는 경우, 생성된 Mapper Impl 구체 클래스를 빈으로 등록하여 Spring의 DI 컨테이너로부터 주입받아 사용할 수 있다.
바로 알아보자.
스프링 빈으로 등록할 수 있는 Mapper 를 위한 Interface
@Mapper(componentModel = "spring")
public interface BeanMapper {
  /*
   * 아래 코드는 더이상 필요없다.
   * BeanMapper INSTANCE = Mappers.getMapper(BeanMapper.class);
   */

  EntityDto toDto(Entity entity);

}
@Mapper애너테이션의componentModel속성을 통해, 어떤 유형의 component 로 등록할지 설정한다.- 우리의 경우, spring bean 으로 등록할 것이므로 spring 으로 작성했다.
BeanMapper INSTANCE = Mappers.getMapper(BeanMapper.class);- 우리는 DI 컨테이너로부터 Mapper Impl 구체 클래스를 주입받아 사용할 것이므로, 이제 더 이상 위 코드는 필요하지 않다.
Mapper 실행
아래와 같이 SpringBoot 를 띄워서 테스트해야한다.
@SpringBootTest
public class MapStructWithSpringTest {

  //MapperImpl 구체 클래스를 DI 컨테이너로부터 주입받는다.
  @Autowired
  private BeanMapper beanMapper;

  @Test
  @DisplayName("Spring Bean 으로 등록된 매퍼 사용")
  void useBasicMapper() {
    //GIVEN
    Entity entity = new Entity(1L, "fieldA Value", "fieldB Value");

    //WHEN
    EntityDto dto = beanMapper.toDto(entity);

    //THEN
    assertAll(
        () -> assertSame(entity.getId(), dto.getId()),
        () -> assertEquals(entity.getFieldA(), dto.getFieldA()),
        () -> assertEquals(entity.getFieldB(), dto.getFieldB())
    );
  }
}
생성된 Mapper Impl 클래스 코드
@Component
public class BeanMapperImpl implements BeanMapper {

    @Override
    public EntityDto toDto(Entity entity) {
        if ( entity == null ) {
            return null;
        }

        EntityDto entityDto = new EntityDto();

        if ( entity.getId() != null ) {
            entityDto.setId( entity.getId() );
        }
        entityDto.setFieldA( entity.getFieldA() );
        entityDto.setFieldB( entity.getFieldB() );

        return entityDto;
    }
}
생성된 코드를 보면 @Component 가 포함된 것을 확인할 수 있다.
따라서 Component Scan 을 통해, Mapper Impl 구체 클래스가 스프링 빈으로 등록된다.
Enum 간 매핑
이번에는 enum 값끼리 매핑을 해보자!
FruitType Enum 와 AppleType Enum
Enum 끼리 매핑을 하기 위해, 총 2개의 Enum 을 선언하자.
public enum GeneralFruitType {
  ORANGE,
  BANANA,
  APPLE
}
public enum DetailFruitType {
  ORANGE,
  BANANA,

  //사과 종류가 GeneralFruitType 보다 많다.
  RED_APPLE,
  YELLOW_APPLE,
  GREEN_APPLE,
}
우리는 DetailFruitType 이 GeneralFruitType 에 매핑되길 원한다고 하자.
DetailFruitType 은 GeneralFruitType 과 동일하게 ORANGE 와 BANANA 를 가지고 있다.
하지만 사과의 종류가 더 많다!
DetailFruitType 의 RED_APPLE , YELLOW_APPLE , GREEN_APPLE 을 GeneralFruitType.APPLE 에 매핑해보자.
Enum 끼리 매핑시키기 위한 Mapper Interface
그렇다면 아래와 같이, enum 을 매핑하기 위한 Interface를 작성할 수 있다.
@Mapper
public interface EnumMapper {
  EnumMapper INSTANCE = Mappers.getMapper(EnumMapper.class);

  //매핑하는 첫번째 방법
  @ValueMappings({
      @ValueMapping(target = "APPLE", source = "RED_APPLE"),
      @ValueMapping(target = "APPLE", source = "YELLOW_APPLE"),
      @ValueMapping(target = "APPLE", source = "GREEN_APPLE")
  })
  GeneralFruitType toFruitType1(DetailFruitType detailFruitType);

  //매핑하는 두번째 방법
  @ValueMapping(target = "APPLE", source = MappingConstants.ANY_REMAINING)
  GeneralFruitType toFruitType2(DetailFruitType detailFruitType);
}
- 첫번째 방법처럼
@ValueMappings와@ValueMapping을 사용하여, 어떻게 매핑할 것인지 작성할 수 있다. - 혹은 두번째 방법처럼
@ValueMapping의source속성에MappingConstants.ANY_REMAINING을 지정하여 조금 더 편리하게 매핑할 수도 있다.GeneralFruitTypeEnum 과DetailFruitTypeEnum 간의 공통점은ORANGE,BANANA값이 존재하는 것이다.- 따라서
DetailFruitTypeEnum 의 나머지 값 (RED_APPLE,YELLOW_APPLE,GREEN_APPLE) 을 모두GeneralFruitType.APPLE에 매핑하면 되므로, 이렇게 간단하게 표현할 수 있다.
Mapper 실행
이제 Enum 간 매핑이 의도한 것과 같이 동작하는지 확인해보자.
@Test
@DisplayName("Enum 간 매핑 - 첫번째 방법")
void enumMapping1() {
  //GIVEN
  DetailFruitType orangeDetailType = DetailFruitType.ORANGE;
  DetailFruitType bananaDetailType = DetailFruitType.BANANA;
  DetailFruitType redAppleDetailType = DetailFruitType.RED_APPLE;
  DetailFruitType yellowAppleDetailType = DetailFruitType.YELLOW_APPLE;
  DetailFruitType greenAppleDetailType = DetailFruitType.GREEN_APPLE;

  //WHEN
  GeneralFruitType orangeResult = EnumMapper.INSTANCE.toFruitType1(orangeDetailType);
  GeneralFruitType bananaResult = EnumMapper.INSTANCE.toFruitType1(bananaDetailType);
  GeneralFruitType redAppleResult = EnumMapper.INSTANCE.toFruitType1(redAppleDetailType);
  GeneralFruitType yellowAppleResult = EnumMapper.INSTANCE.toFruitType1(yellowAppleDetailType);
  GeneralFruitType greenAppleResult = EnumMapper.INSTANCE.toFruitType1(greenAppleDetailType);

  //THEN
  assertAll(
      () -> assertSame(GeneralFruitType.ORANGE, orangeResult),
      () -> assertSame(GeneralFruitType.BANANA, bananaResult),
      () -> assertSame(GeneralFruitType.APPLE, redAppleResult),
      () -> assertSame(GeneralFruitType.APPLE, yellowAppleResult),
      () -> assertSame(GeneralFruitType.APPLE, greenAppleResult)
  );
}

@Test
@DisplayName("Enum 간 매핑 - 두번째 방법")
void enumMapping2() {
  //GIVEN
  DetailFruitType orangeDetailType = DetailFruitType.ORANGE;
  DetailFruitType bananaDetailType = DetailFruitType.BANANA;
  DetailFruitType redAppleDetailType = DetailFruitType.RED_APPLE;
  DetailFruitType yellowAppleDetailType = DetailFruitType.YELLOW_APPLE;
  DetailFruitType greenAppleDetailType = DetailFruitType.GREEN_APPLE;

  //WHEN
  GeneralFruitType orangeResult = EnumMapper.INSTANCE.toFruitType2(orangeDetailType);
  GeneralFruitType bananaResult = EnumMapper.INSTANCE.toFruitType2(bananaDetailType);
  GeneralFruitType redAppleResult = EnumMapper.INSTANCE.toFruitType2(redAppleDetailType);
  GeneralFruitType yellowAppleResult = EnumMapper.INSTANCE.toFruitType2(yellowAppleDetailType);
  GeneralFruitType greenAppleResult = EnumMapper.INSTANCE.toFruitType2(greenAppleDetailType);

  //THEN
  assertAll(
      () -> assertSame(GeneralFruitType.ORANGE, orangeResult),
      () -> assertSame(GeneralFruitType.BANANA, bananaResult),
      () -> assertSame(GeneralFruitType.APPLE, redAppleResult),
      () -> assertSame(GeneralFruitType.APPLE, yellowAppleResult),
      () -> assertSame(GeneralFruitType.APPLE, greenAppleResult)
  );
}
모두 정상적으로 동작한다.
생성된 Mapper Impl 클래스 코드
public class EnumMapperImpl implements EnumMapper {

  @Override
  public GeneralFruitType toFruitType1(DetailFruitType detailFruitType) {
    if ( detailFruitType == null ) {
      return null;
    }

    GeneralFruitType generalFruitType;

    switch ( detailFruitType ) {
      case RED_APPLE: generalFruitType = GeneralFruitType.APPLE;
      break;
      case YELLOW_APPLE: generalFruitType = GeneralFruitType.APPLE;
      break;
      case GREEN_APPLE: generalFruitType = GeneralFruitType.APPLE;
      break;
      case ORANGE: generalFruitType = GeneralFruitType.ORANGE;
      break;
      case BANANA: generalFruitType = GeneralFruitType.BANANA;
      break;
      default: throw new IllegalArgumentException( "Unexpected enum constant: " + detailFruitType );
    }

    return generalFruitType;
  }

  @Override
  public GeneralFruitType toFruitType2(DetailFruitType detailFruitType) {
    if ( detailFruitType == null ) {
      return null;
    }

    GeneralFruitType generalFruitType;

    switch ( detailFruitType ) {
      case ORANGE: generalFruitType = GeneralFruitType.ORANGE;
      break;
      case BANANA: generalFruitType = GeneralFruitType.BANANA;
      break;
      default: generalFruitType = GeneralFruitType.APPLE;
    }

    return generalFruitType;
  }
}
위에 생성된 코드를 보자.
첫번째 방법과 두번째 방법 간의 차이가 보이는가?
딱봐도 두번째 방법이 더 간결하고 효율적으로 보인다!
첫번째 방법을 사용하면, 모든 값이 일일이 switch 문으로 매핑된다.
하지만 두번째 방법을 사용하면, 좀 더 간결하게 처리한다.
만약 RED_APPLE 과 같이 APPLE 에 매핑되어야 하는 값이 무수히 많다면, 첫번째 방법은 효율적이지 않다.
또한 두번째 방법이 속도가 더 빠르다.
데이터 타입을 변환하며 매핑하기
추가적으로 MapStruct 는 데이터 변환과 동시에 매핑을 할 수 있도록 지원한다.
아래는 자동으로 변환되는 데이터 타입 유형이다.
- 원시 타입 ↔ Wrapper 클래스
- int ↔ Integer , long ↔ Long 등
- 원시 타입 ↔ String
- int ↔ String 등
- Enum ↔ String
- BigInt ↔ BigDecimal ↔ String
- 여러 Date 타입 ↔ String
우리는 직접 Date 타입의 값을 String 타입의 필드에 매핑해보도록 하자.
LocalDate 타입의 필드를 갖는 엔티티
LocalDate 타입의 필드를 갖도록 새로운 엔티티를 작성하자.
@Getter
@Setter
@NoArgsConstructor
@AllArgsConstructor
public class LocalDateEntity {
  private Long id;
  private LocalDate localDate;
}
String 타입의 필드를 갖는 DTO
그리고 이를 위한 DTO 클래스를 작성하자.
@Getter
@Setter
@NoArgsConstructor
@AllArgsConstructor
public class LocalDateDto {
  private long id;
  private String date; // 엔티티의 localDate 필드값이 매핑
}
LocalDate → String 으로 자동으로 타입을 변환하는 Mapper Interface
@Mapper
public interface LocalDateMapper {
  LocalDateMapper INSTANCE = Mappers.getMapper(LocalDateMapper.class);

  @Mapping(target = "date", source = "localDate", dateFormat = "yyyy/MM/dd")
  LocalDateDto toDto(LocalDateEntity entity);
}
@Mapping애너테이션의dateFormat속성을 통해, 어떤 형식의 String 으로 변환할 것인지 설정할 수 있다.target,source속성은 이전과 동일하게 사용하면 된다. 그럼 자동으로 데이터를 변환하여 매핑해준다.
Mapper 실행
@Test
@DisplayName("LocalDate 값을 String 타입에 매핑")
void localDateMapper() {
  //GIVEN
  LocalDateEntity entity = new LocalDateEntity(1L, LocalDate.now());

  //WHEN
  LocalDateDto dto = LocalDateMapper.INSTANCE.toDto(entity);
  boolean matchResult = Pattern.matches("^[0-9]{4}/[0-9]{2}/[0-9]{2}$", dto.getDate());

  //THEN
  assertAll(
      () -> assertSame(entity.getId(), dto.getId()),
      () -> assertTrue(matchResult)
  );
}
정규표현식을 통해 제대로 변환이 되었는지 검증하였다.
생성된 Mapper Impl 클래스 코드
public class LocalDateMapperImpl implements LocalDateMapper {

  private final DateTimeFormatter dateTimeFormatter_yyyy_MM_dd_0102516032 = DateTimeFormatter.ofPattern( "yyyy/MM/dd" );

  @Override
  public LocalDateDto toDto(LocalDateEntity entity) {
    if ( entity == null ) {
      return null;
    }

    LocalDateDto localDateDto = new LocalDateDto();

    if ( entity.getLocalDate() != null ) {
      localDateDto.setDate( dateTimeFormatter_yyyy_MM_dd_0102516032.format( entity.getLocalDate() ) );
    }
    if ( entity.getId() != null ) {
      localDateDto.setId( entity.getId() );
    }

    return localDateDto;
  }
}
자동으로 타입 변환 로직이 들어간 것을 확인할 수 있다.
직접 Mapper Impl 구체 클래스에 매핑 메서드 추가하기
혹시 직접 Mapper Impl 구체 클래스에 메서드를 추가하고 싶을 수 있다.
‘특수한 로직이 필요한 매핑 메서드’와 ‘자동으로 생성된 기본 매핑 메서드’를 모두 Mapper Impl 객체에 접근하여 사용하면 관리하기 쉽다.
이때는 default 메서드를 작성하면 된다.
default 메서드가 있는 Mapper Interface
@Mapper
public interface DefaultMethodMapper {
  DefaultMethodMapper INSTANCE = Mappers.getMapper(DefaultMethodMapper.class);

  //MapStruct 에서 생성해주는 매핑 메서드
  EntityDto basicToDto(Entity entity);

  //직접 작성한 매핑 메서드
  default EntityDto specialToDto(Entity entity) {
    EntityDto dto = new EntityDto();

    dto.setId(entity.getId());
    dto.setFieldA("Special Value of A!!!");
    dto.setFieldB("Special Value of B!!!");

    return dto;
  }
}
default키워드를 사용하여 직접 메서드를 인터페이스에서 구현한다.
Mapper 실행
@Test
@DisplayName("default method 를 통한 매핑 메서드 직접 구현")
void defaultMethodMapper() {
  //GIVEN
  Entity entity = new Entity(1L, "valueA", "valueB");

  //WHEN
  EntityDto basicDto = DefaultMethodMapper.INSTANCE.basicToDto(entity);
  EntityDto specialDto = DefaultMethodMapper.INSTANCE.specialToDto(entity);

  //THEN
  assertAll(
      () -> assertSame(entity.getId(), basicDto.getId()),
      () -> assertEquals(entity.getFieldA(), basicDto.getFieldA()),
      () -> assertEquals(entity.getFieldB(), basicDto.getFieldB()),
      () -> assertSame(entity.getId(), basicDto.getId()),
      () -> assertEquals("Special Value of A!!!", specialDto.getFieldA()),
      () -> assertEquals("Special Value of B!!!", specialDto.getFieldB())
  );
}
생성된 Mapper Impl 클래스 코드
public class DefaultMethodMapperImpl implements DefaultMethodMapper {

  @Override
  public EntityDto basicToDto(Entity entity) {
    if ( entity == null ) {
      return null;
    }

    EntityDto entityDto = new EntityDto();

    if ( entity.getId() != null ) {
      entityDto.setId( entity.getId() );
    }
    entityDto.setFieldA( entity.getFieldA() );
    entityDto.setFieldB( entity.getFieldB() );

    return entityDto;
  }
}
default 메서드는 따로 오버라이딩할 필요가 없으므로 구현체에서 제외되었다.
필드 기본값 설정
@Mapping 애너테이션의 속성 중, contants 와 default 속성을 사용하여 필드의 기본값을 설정할 수 있다.
바로 알아보자.
필드의 기본값을 설정하는 Mapper Interface
@Mapper
public interface DefaultValueMapper {
  DefaultValueMapper INSTANCE = Mappers.getMapper(DefaultValueMapper.class);

  @Mapping(target = "id", constant = "-1L")
  @Mapping(target = "fieldA", defaultValue = "empty value")
  EntityDto toDto(Entity entity);
}
constant속성은 source 의 필드(여기에선Entity.id)에 관계없이 무조건 해당 값을 매핑하는 역할이다.defaultValue속성은 source 의 필드 (여기에선Entity.fieldA)이 null 일 때, 해당 값을 매핑하는 역할이다.
Mapper 실행
@Test
@DisplayName("필드에 기본값 매핑")
void abstractMapper() {
  //GIVEN
  Entity entity = new Entity(10L, null, null);

  //WHEN
  EntityDto dto = DefaultValueMapper.INSTANCE.toDto(entity);

  //THEN
  assertAll(
      () -> assertSame(-1L, dto.getId()),
      () -> assertEquals("empty value", dto.getFieldA()),
      () -> assertNull(dto.getFieldB())
  );
}
id 필드에 설정한 contants 속성 때문에, 무조건 id 필드에는 -1L 이 들어가게 된다.
fieldA 필드에는 defaultValue 속성을 설정했으니, 엔티티의 필드값인 null 대신 empty value 가 들어간다.
defaultValue 가 없다면 fieldB 처럼 그대로 null 이 들어가게 된다.
생성된 Mapper Impl 클래스 코드
public class DefaultValueMapperImpl implements DefaultValueMapper {

  @Override
  public EntityDto toDto(Entity entity) {
    if ( entity == null ) {
      return null;
    }

    EntityDto entityDto = new EntityDto();

    if ( entity.getFieldA() != null ) {
      entityDto.setFieldA( entity.getFieldA() );
    }
    else {
      entityDto.setFieldA( "empty value" );
    }
    entityDto.setFieldB( entity.getFieldB() );

    entityDto.setId( -1L );

    return entityDto;
  }
}
자바 표현식을 사용해서 값 매핑하기
매핑할 필드에 들어갈 값을 직접 자바 표현식으로 넣을 수 있다.
자바 표현식이 포함된 Mapper Interface
@Mapper(imports = {LocalDateTime.class, UUID.class})
public interface ExpressionMapper {
  ExpressionMapper INSTANCE = Mappers.getMapper(ExpressionMapper.class);

  @Mapping(target = "id", expression = "java(UUID.randomUUID().getMostSignificantBits() & Long.MAX_VALUE)")
  @Mapping(target = "fieldA", defaultExpression = "java(LocalDateTime.now().toString())")
  EntityDto toDto(Entity entity);
}
@Mapper애너테이션의import속성으로 자바 표현식을 사용할 때 필요한 클래스 정보를 넘긴다.- 자바 표현식을 사용하려면
@Mapping애너테이션의expression속성이나defaultExpression속성을 사용하면 된다.expression속성 : 무조건 해당 표현식의 반환값으로 값을 매핑한다.defaultExpression속성 : source 의 필드값이 null 인 경우 적용한다.
- 자바 표현식은
java(표현식)형식으로 작성해야 한다.
Mapper 실행
@Test
@DisplayName("자바 표현식으로 매핑")
void expressionMapper() {
  //GIVEN
  Entity entity = new Entity(10L, null, "fieldB value");

  //WHEN
  EntityDto dto = ExpressionMapper.INSTANCE.toDto(entity);
  log.info("dto.id = {}", dto.getId());
  log.info("dto.fieldA = {}", dto.getFieldA());
  log.info("dto.fieldB = {}", dto.getFieldB());

  //THEN
  assertAll(
      () -> assertNotSame(entity.getId(), dto.getId()),
      () -> assertNotNull(dto.getFieldA()),
      () -> assertEquals("fieldB value", dto.getFieldB())
  );
}
Slf4J 로 표현식을 적용한 결과를 출력해보았다.
아래가 그 결과이다.
dto.id = 5328389994822649078
dto.fieldA = 2022-09-16T16:23:59.364672
dto.fieldB = fieldB value
정상적으로 적용됐다!
생성된 Mapper Impl 클래스 코드
public class ExpressionMapperImpl implements ExpressionMapper {

  @Override
  public EntityDto toDto(Entity entity) {
    if ( entity == null ) {
      return null;
    }

    EntityDto entityDto = new EntityDto();

    if ( entity.getFieldA() != null ) {
      entityDto.setFieldA( entity.getFieldA() );
    }
    else {
      entityDto.setFieldA( LocalDateTime.now().toString() );
    }
    entityDto.setFieldB( entity.getFieldB() );

    entityDto.setId( UUID.randomUUID().getMostSignificantBits() & Long.MAX_VALUE );

    return entityDto;
  }
}
매핑하며 예외처리하기
MapStruct는 매핑을 하면서 간편하게 예외처리를 할 수 있도록 지원한다.
이를 위해선 먼저 예외처리 관련 로직을 따로 작성해야한다.
예외처리 클래스 작성
예외처리를 위한 Validator 라는 클래스를 따로 만들어서 설명하겠다.
public class Validator {

  public long validate1(Long id) {
    if (id < 0) {
      throw new IllegalArgumentException();
    }
    return id;
  }

  public String validate2(String field) {
    if (field == null || field.length() == 0) {
      throw new IllegalArgumentException();
    }
    return field;
  }

}
- 각 메서드는 예외처리 로직을 담고 있다.
- 이때 검증할 필드 (파라미터에 넘어올 source 의 필드값) 의 타입이 중요하다!
validate1메서드와 같이, 파라미터 타입이Long이라면 source 의 모든Long형 필드값이validate1메서드에 전달되어 검증된다.- 따라서
Entity엔티티 클래스의 필드 중fieldA와fieldB가String형이므로, 이 두 개의 필드값이validate2메서드에 전달되어 검증된다.
타입을 통해 어떤 필드를 검증할지 결정하므로, 파라미터의 이름은 전혀 관계가 없다.
예외처리를 적용한 Mapper Interface
@Mapper(uses = Validator.class)
public interface ExceptionMapper {
  ExceptionMapper INSTANCE = Mappers.getMapper(ExceptionMapper.class);

  EntityDto toDto(Entity entity) throws IllegalArgumentException;
}
- 매우 단순하게
@Mapper애너테이션의uses속성으로 예외처리 클래스를 넘겨주면 된다. - 메서드에
throws문을 추가해주면 자동으로 예외처리를 하게 된다.
Mapper 실행
@Test
@DisplayName("예외처리와 함께 매핑")
void exceptionMapper() {
  //GIVEN
  Entity invalidIdEntity = new Entity(-10L, "fieldA value", "fieldB value");
  Entity invalidFieldEntity1 = new Entity(1L, "", "fieldB value");
  Entity invalidFieldEntity2 = new Entity(1L, "fieldA value", "");
  Entity validEntity = new Entity(1L, "fieldA value", "fieldB value");

  //WHEN
  //ExceptionMapper.INSTANCE.toDto(invalidIdEntity);
  //ExceptionMapper.INSTANCE.toDto(invalidFieldEntity1);
  //ExceptionMapper.INSTANCE.toDto(invalidFieldEntity2)
  ExceptionMapper.INSTANCE.toDto(validEntity);

  //THEN
  assertAll(
      () -> assertThrows(
          IllegalArgumentException.class,
          () -> ExceptionMapper.INSTANCE.toDto(invalidIdEntity)
      ),
      () -> assertThrows(
          IllegalArgumentException.class,
          () -> ExceptionMapper.INSTANCE.toDto(invalidFieldEntity1)
      ),
      () -> assertThrows(
          IllegalArgumentException.class,
          () -> ExceptionMapper.INSTANCE.toDto(invalidFieldEntity2)
      ),
      () -> assertDoesNotThrow(
          () -> ExceptionMapper.INSTANCE.toDto(validEntity)
      )
  );
}
생성된 Mapper Impl 클래스 코드
public class ExceptionMapperImpl implements ExceptionMapper {

  private final Validator validator = new Validator();

  @Override
  public EntityDto toDto(Entity entity) throws IllegalArgumentException {
    if ( entity == null ) {
      return null;
    }

    EntityDto entityDto = new EntityDto();

    entityDto.setId( validator.validate1( entity.getId() ) );
    entityDto.setFieldA( validator.validate2( entity.getFieldA() ) );
    entityDto.setFieldB( validator.validate2( entity.getFieldB() ) );

    return entityDto;
  }
}
Mapping 설정 상속받아 사용하기
지금까지 매핑을 하기 위해, 열심히 @Mapping 애너테이션을 사용했다.
이 애너테이션으로 필드 간 어떻게 매핑을 해야하는지, MapStruct 의 코드 생성기 (Annotation Processor) 에게 알려주었다.
이렇게 @Mapping 을 통한 설정을 하다보면, 반복해서 작성해야 하는 경우가 있다.
대표적인 예가 바로, “DTO 객체로 엔티티를 업데이트” 하는 경우이다.
이전에 살펴보았던 Update Mapper 의 경험을 떠올리며 아래 코드를 보자.
@Getter
@Setter
@NoArgsConstructor
@AllArgsConstructor
public class MyEntity {
  private Long id;
  private int myFieldA; //MyDto의 newMyFieldA 와 매핑되어야 함.
  private int myFieldB; //MyDto의 newMyFieldB 와 매핑되어야 함.
}
@Getter
@Setter
@NoArgsConstructor
@AllArgsConstructor
public class MyDto {
  private long id;
  private int newMyFieldA;
  private int newMyFieldB;
}
먼저 위와 같이 엔티티 클래스와 DTO 클래스가 있다고 하자.
그리고 이 둘을 DTO → Entity 로 매핑하기 위해, 아래와 같이 Mapper Interface 를 작성했다고 하자.
@Mapper
public interface NoInheritMapper {
  NoInheritMapper INSTANCE = Mappers.getMapper(NoInheritMapper.class);

  @Mapping(target = "myFieldA", source = "newMyFieldA")
  @Mapping(target = "myFieldB", source = "newMyFieldB")
  MyEntity toEntity(MyDto dto); //toDto가 아님에 주의
}
여기까지는 매우 쉽다.
위에서 계속해서 설명한 toDto(...) 메서드와 크게 다른 것이 없다.
그리고 우리가 이전에 살펴봤듯, DTO 의 값을 통해 엔티티를 업데이트하는 메서드를 동일한 Mapper Interface에 추가해보자.
@Mapper
public interface NoInheritMapper {
  NoInheritMapper INSTANCE = Mappers.getMapper(NoInheritMapper.class);

  @Mapping(target = "myFieldA", source = "newMyFieldA")
  @Mapping(target = "myFieldB", source = "newMyFieldB")
  MyEntity toEntity(MyDto dto);

  //MtDto 값으로 MyEntity 업데이트
  @Mapping(target = "myFieldA", source = "newMyFieldA")
  @Mapping(target = "myFieldB", source = "newMyFieldB")
  void updateEntity(MyDto dto, @MappingTarget MyEntity entity);
}
updateEntity(...) 메서드를 추가했다.
그리고 여기에서 비효율적인 코드가 보인다.
바로 @Mapping 부분이다.
toEntity(...) 메서드의 source 는 MyDto 이고, target 은 MyEntity 이다.
updateEntity(...) 메서드도 toEntity(...) 메서드와 동일하다.
updateEntity(...) 메서드의 source 는 MyDto 이고, target 은 MyEntity 이다.
그래서 toEntity(...) 메서드와 updateEntity(...) 메서드 모두 동일한 매핑 설정 (@Mapping) 을 사용하게 된다.
바로 이런 경우, @InheritConfiguration 애너테이션을 사용할 수 있다.
@InheritConfiguration 을 사용하는 Mapper Interface
위에서 작성한 NoInheritMapper 인터페이스를 아래와 같이 수정할 수 있다.
@Mapper
public interface InheritMapper {
  InheritMapper INSTANCE = Mappers.getMapper(InheritMapper.class);

  @Mapping(target = "myFieldA", source = "newMyFieldA")
  @Mapping(target = "myFieldB", source = "newMyFieldB")
  MyEntity toEntity(MyDto dto);

  //toEntity() 메서드의 @Mapping 설정을 그대로 가져온다.
  @InheritConfiguration
  void updateEntity(MyDto dto, @MappingTarget MyEntity entity);
}
이런식으로 말이다.
그렇다면 MapStruct 가 어떻게 알고 toEntity(...) 의 매핑설정을 가져오는 것일까?
그 답은 바로, target과 source 에 있다.
@InheritConfiguration 애너테이션을 적용하면, 코드 생성기(Code Generator)에게 아래와 같이 알려준다.
- 같은 매퍼(여기에선
InheritMapper인터페이스)에 같은 target과 source 를 갖는 다른 메서드가 있는지 확인해라.- 따라서
updateEntity(...)의 target과 source 를 동일하게 갖는updateEntity(...)메서드를 찾게 된다.
단 target과 source 가 동일한 메서드가 2개 이상이면 안된다.
이 경우, 어떻게 해야하는지 아래에서 다룬다. - 따라서
- target과 source 가 갖은 다른 메서드를 찾았다면, 해당 메서드의 매핑설정(
@Mapping)을 가져와서 적용해라.- 그래서
updateEntity(...)에toEntity(...)의 매핑 설정이 적용된다.
- 그래서
테스트코드는 생략한다.
target 과 source 를 바꿔 매핑설정 상속받기
그러면 이번에는 Entity → DTO 방향으로 매핑하는 메서드(toDto)를 추가해보자.
방금 전에 살펴본
NoInheritMapper인터페이스이다.
@Mapper
public interface NoInheritMapper {
  NoInheritMapper INSTANCE = Mappers.getMapper(NoInheritMapper.class);

  @Mapping(target = "myFieldA", source = "newMyFieldA")
  @Mapping(target = "myFieldB", source = "newMyFieldB")
  MyEntity toEntity(MyDto dto);

  //MtDto 값으로 MyEntity 업데이트
  @Mapping(target = "myFieldA", source = "newMyFieldA")
  @Mapping(target = "myFieldB", source = "newMyFieldB")
  void updateEntity(MyDto dto, @MappingTarget MyEntity entity);

	//새로 추가됨
  @Mapping(target = "newMyFieldA", source = "myFieldA")
  @Mapping(target = "newMyFieldB", source = "myFieldB")
  MyDto toDto(MyEntity entity);
}
위에서 작성한 toEntity(...) 와 toDto(...) 메서드의 매핑 설정이 거의 같다고 보인다.
단순히 target과 source가 서로 뒤바뀐것 이외에는 모두 동일한 매핑 설정이다.
이런 경우엔, @InheritConfiguration 대신, @InheritInverseConfiguration 을 사용할 수 있다.
@InheritInverseConfiguration 을 사용하는 Mapper Interface
@Mapper
public interface InheritMapper {
  InheritMapper INSTANCE = Mappers.getMapper(InheritMapper.class);

  @Mapping(target = "myFieldA", source = "newMyFieldA")
  @Mapping(target = "myFieldB", source = "newMyFieldB")
  MyEntity toEntity(MyDto dto);

  //toEntity() 메서드의 @Mapping 설정을 그대로 가져온다.
  @InheritConfiguration(name = "toEntity")
  void updateEntity(MyDto dto, @MappingTarget MyEntity entity);

  //toEntity() 메서드의 @Mapping 설정에서 target과 source를 뒤바꿔 가져온다.
  @InheritInverseConfiguration(name = "toEntity")
  MyDto toDto(MyEntity entity);
}
새로 추가된 메서드 toDto(...) 를 보자.
@InheritInverseConfiguration 애너테이션을 사용해서, toEntity(...) 메서드의 매핑 설정을 가져와 target과 source 를 뒤바꿔 적용시켰다.
즉 아래 매핑 설정을 toDto(...) 에 적용한 것과 같다.
@Mapping(target = "newMyFieldA", source = "myFieldA")
@Mapping(target = "newMyFieldB", source = "myFieldB")
또한, 여기에서 주목해야 하는 것은 @InheritConfiguration 과 @InheritInverseConfiguration 의 name 속성이다.
이 name 속성은 어떤 메서드의 매핑 설정을 가져올지 알려주는 역할을 한다.
updateEntity(...) 메서드와 toDto(...) 메서드 모두 toEntity(...) 메서드의 매핑 설정을 가져올 것이므로, name 속성에 해당 메서드의 이름을 설정했다.
이전에 updateEntity(...) 를 작성할 때 name 속성을 따로 작성하지 않은 이유는, target과 source가 같은 메서드가 하나밖에 없기 때문이었다.
하지만 toDto(...) 메서드를 추가하고 @InheritInverseConfiguration 를 붙이게 되면, toDto(...) 가 toEntity(...) 와 updateEntity(...) 중 어떤 메서드의 매핑 설정을 가져와야 하는지 모르기 때문에 반드시 name 속성을 지정해야한다.
역시 테스트코드는 생략하겠다.
마치며…
이 글을 처음부터 끝까지 정독한 사람은 많지 않겠지만, 열심히 정리해보았다.
글이 많이 길어져, 일종의 튜토리얼이나 Reference 처럼 사용되어도 좋을 것 같다.
이 글을 작성하며, 나 역시 MapStruct 에 대해 많은 것을 알게되어 만족스럽다.
그리고 후반부로 갈수록 글이 딱딱하게 지는 것 같다… 반성…
다루지 않은 부분
추상 클래스를 통해 Mapper 를 생성하는 부분과 @BeforeMapping , @AfterMapping 에 대해서는 다루지 않았다.
하지만 이정도만 알아도 괜찮지 않을까 싶다.
추후 필요하다면! 다루지 않은 부분도 정리해볼수 있을 것 같다.