
속성 값 설정
개요
- 타임리프는 주로 HTML 태그에
th:*속성을 지정하는 방식으로 동작한다. th:*로 속성을 적용하면 기존 속성을 대체한다.- 기존 속성이 없으면 새로 만든다.
예시 코드
컨트롤러
@Controller
@RequestMapping("/basic")
public class BasicController {

	@GetMapping("/attribute")
	public String attribute() {
		return "basic/attribute";
	}

}
타임리프
<!DOCTYPE html>
<html xmlns:th="http://www.thymeleaf.org">
<head>
<meta charset="UTF-8">
<title>Title</title>
</head>
<body>
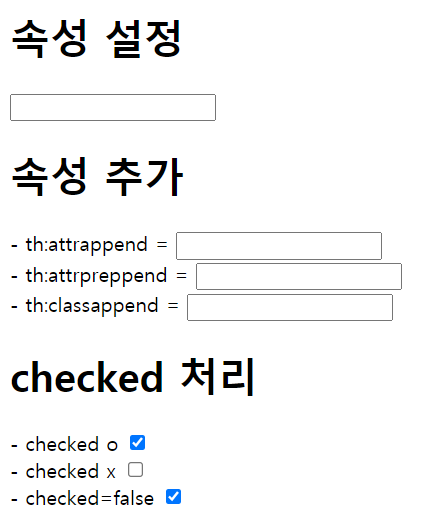
<h1>속성 설정</h1>
<input type="text" name="mock" th:name="userA" />
<h1>속성 추가</h1>
- th:attrappend = <input type="text" class="text" th:attrappend="class=' large'" /><br/>
- th:attrprepend = <input type="text" class="text" th:attrprepend="class='large '" /><br/>
- th:classappend = <input type="text" class="text" th:classappend="large" /><br/>
<h1>checked 처리</h1>
- checked o <input type="checkbox" name="active" th:checked="true" /><br/>
- checked x <input type="checkbox" name="active" th:checked="false" /><br/>
- checked=false <input type="checkbox" name="active" checked="false" /><br/>
</body>
</html>
아래에서 자세히 설명하도록 하겠다.
결과
상세 설명
속성 설정
<input type="text" name="mock" th:name="userA" />- 기존의 속성
name의 값이 타임리프로 렌더링되면"mock"에서"userA"로 변경된다.
- 기존의 속성
속성 추가
<input type="text" class="text" th:attrappend="class=' large'" />th:attrappend="속성이름=뒤에_추가할값"을 통해 특정 속성의 값을 뒷쪽에 추가할 수 있다.- 위 코드에서는
<input>태그의class속성에 값을 추가한 것이다. - 단, 뒷쪽으로 이어서 추가한다.
- 위 코드의 결과는 다음과 같다.
<input type="text" class="text large" />
<input type="text" class="text" th:attrprepend="class='large '" />th:attrprepend="속성이름=앞에_추가할값"을 통해 특정 속성의 값을 앞쪽에 추가할 수 있다.- 위 코드에서는
<input>태그의class속성에 값을 추가한 것이다. - 단, 앞쪽에 추가한다.
- 위 코드의 결과는 다음과 같다.
<input type="text" class="large text" />
<input type="text" class="text" th:classappend="large" />- 위에서 설명한 방식으로
class속성을 변경하기엔 너무 번거롭다. - 따라서, 타임리프는
th:classappend="class속성에_추가할값"을 지원한다. - 단, 뒷쪽으로 이어서 추가한다.
- 위 코드의 결과는 다음과 같다.
<input type="text" class="text large" />
- 위에서 설명한 방식으로
checked 처리
- HTML에서의
checked속성 처리- HTML에서
checked속성을 사용하기만 하면, 값이 무엇이던간에 무조건 checked로 처리한다. <input type="checkbox" checked /><input type="checkbox" checked="true" /><input type="checkbox" checked="false" />- 위 세가지 경우, 모두 checked로 처리된다!
- 이 문제를 타임리프로 해결할 수 있다.
- HTML에서
<input type="checkbox" name="active" th:checked="true" />th:checked="true",th:checked="false"속성을 통해 check 여부를 설정할 수 있다.th:checked="true"- 체크됨
th:checked="false"- 체크안됨
![]()
- 본 게시글은 김영한님의 강의를 토대로 정리한 글입니다.
- 더 자세한 내용을 알고 싶으신 분들이 계신다면, 해당 강의를 수강하시는 것을 추천드립니다.