
지난 포스팅에서 Spring Security의 전체적인 구조에 대해 알아봤습니다.
이번 포스팅에서는 Spring Security가 지원하는 인증(Authentication)의 아키텍처를 알아보겠습니다.
인증과 관련된 전체 아키텍처에 대해서 설명할 것이고, 특정 인증 방식에 대한 구체적인 방법은 다음 포스팅에서 다루도록 하겠습니다.
주요 컴포넌트
본격적인 설명에 앞서, 인증에 사용되는 Spring Security의 주요 컴포넌트들을 간략하게 알아볼까요?
SecurityContextHolder- 인증이 완료된 클라이언트의 세부 정보가 저장되는 컴포넌트입니다.
SecurityContext- 클라이언트의 인증 정보를 가지고 있으며,
SecurityCotextHolder가 이 컴포넌트를 가지고 있습니다.
- 클라이언트의 인증 정보를 가지고 있으며,
Authentication- 클라이언트가 인증하기 위해 제출한 정보나, 이미 인증되어
SecurotyContext에 저장된 사용자 정보입니다. principal,credentials,authorities,details,authenticated속성이 존재합니다.
- 클라이언트가 인증하기 위해 제출한 정보나, 이미 인증되어
GrantedAuthorityAuthentication과 관련된 사용자의 권한 정보입니다.- Ex. 역할(Role), 범위(Scope) 등…
AuthenticationManager- 실제로 인증 로직이 작성된 클래스가 구현해야 하는 인터페이스입니다.
ProviderManagerAuthenticationManager의 가장 일반적인 구현체입니다.
AuthenticationProviderProviderManager에 의해 사용되며, 특정 인증 타입에 대해 동작합니다.
AbstractAuthenticationProcessingFilter- 인증에 사용되는 기본 필터입니다.
이제 본격적으로 하나씩 자세히 알아봅시다!
SecurityContextHolder
Spring Security의 인증 처리 모델에서 가장 중요한 것이 바로 SecurityContextHolder 입니다.
SecurityContextHolder 는 SecurityContext 를 포함하고 있습니다.

SecurityContextHolder 에 인증된 사용자의 세부 정보가 저장됩니다.
인증 성공을 어떻게 나타내야 할까?
SecurityContextHolder 에는 인증된 사용자의 정보가 저장되기 때문에, 여기에 저장된 사용자는 모두 성공적으로 인증된 사용자입니다.
따라서 아래 코드처럼 작성하여, 인증 성공처리를 할 수 있습니다.
//1. 빈 SecurityContext 생성
SecurityContext context = SecurityContextHolder.createEmptyContext();

//2. 클라이언트가 로그인을 시도한 정보로 Authentication 생성
Authentication authentication =
    new TestingAuthenticationToken("username", "password", "ROLE_USER");
context.setAuthentication(authentication);

//3. SecurityContextHolder에 저장하여, 인증 성공 처리
SecurityContextHolder.setContext(context);
- 인증 정보인
Authentication을 저장하기 위해서, 빈SecurityContext를 만들어야 합니다.
만약 기존에 있던SecurityContext를 사용한다면 (SecurityContextHolder.getContext().setAuthentication(authentication)같은 코드를 사용해서), 동시성 문제가 발생할 수 있습니다. - 새로운
Authentication객체를 생성합니다.
이때Authentication의 구현체는 자유롭게 사용할 수 있습니다. (Authentication인터페이스만 구현하면 됩니다.)
이 예시 코드에서는 간단한TestingAuthenticationToken을 사용했는데, 보통 프로덕션 환경에서는UsernamePasswordAuthenticationToken을 주로 사용합니다. - 이제 이
Authentication를SecurityContextHolder에 저장해서 성공한 인증 정보를 관리하도록 처리합니다.
이렇게 저장된 인증 정보는 인가(Authorization)시 사용됩니다.
저장한 인증 정보 가져오기
그러면 이번에는 저장한 인증 정보를 가져와볼까요?
//1. SecurityContext 가져오기
SecurityContext context = SecurityContextHolder.getContext();

//2. Authentication 가져오기
Authentication authentication = context.getAuthentication();

//3. 사용자 정보 가져오기
String username = authentication.getName();
Object principal = authentication.getPrincipal();
Collection<? extends GrantedAuthority> authorities = authentication.getAuthorities();
위 코드에서 유심히 봐야하는 부분은 바로 1번입니다.
SecurityContext 를 가져오기 위해, SecurityContextHolder 의 클래스 변수를 참조했음을 알 수 있습니다!
맞습니다. SecurityContextHolder 는 SecurityContext 를 클래스 변수(static 변수)로 관리합니다.
그렇다면, 멀티 쓰레드 환경에서 동시에 여러 SecurityContext 를 저장하려고 하면 문제가 발생하지 않을까요?
그렇지 않습니다.
SecurityContextHolder 는 이 변수를 Thread Local 로 관리하기 때문입니다.
Thread Local로 SecurityContext 를 관리함으로써, 굳이 메서드에 SecurityContext 를 Argument로 넘겨주지 않고도, 동일한 쓰레드에서 접근할 수 있게 되는 이점까지 가져갈 수 있습니다.
단, 하나의 인증 작업를 완료했을 때, 이 Thread Local을 비워줘야 합니다.
(해당 쓰레드가 다시 사용될때 문제가 발생함)
따라서, Spring Security의FilterChainProxy가 Thread Local (SecurityContext객체)를 제거하는 역할을 수행합니다.
만약 데스크탑 애플리케이션과 같이, 동시 사용자가 1명 밖에 없는 경우에는 어떨까요?
이 경우에는 Thread Local을 사용하지 않고, 공통된 SecurityContext 를 사용해야 합니다.
모든 쓰레드가 하나의
SecurityContext에 접근할 수 있어야 하므로
이런 상황에 대비해, SecurityContextHolder 의 컨텍스트 저장 전략을 변경할 수 있도록 지원합니다.
SecurityContextHolder.MODE_THREADLOCAL 전략 대신, SecurityContextHolder.MODE_GLOBAL 전략을 선택해 SecurityContextHolder 를 설정할 수 있습니다.
Authentication
인증 정보를 담고 있는 Authentication 에 대해서 알아봅시다.
Authentication 은 아래 4가지 주요 속성을 갖습니다.
principal: 사용자 자체를 의미합니다. 주로 아이디나 사용자 객체를 저장합니다.credentials: 인증키를 의미합니다. 주로 비밀번호가crendentials가 됩니다.details: 부가 정보authenticated: 인증 성공 여부
현재 인증 HTTP 요청을 처리하고 있는 동안, 이 Authentication 객체에 전역적으로 접근할 수 있습니다. (SecurityContext 를 통해서)
위에서 설명했듯이, SecurityContextHolder 가 SecurityContext 를 Thread Local로 관리하기 때문에, 하나의 쓰레드에서 전역적으로 Authentication 를 참조할 수 있습니다.
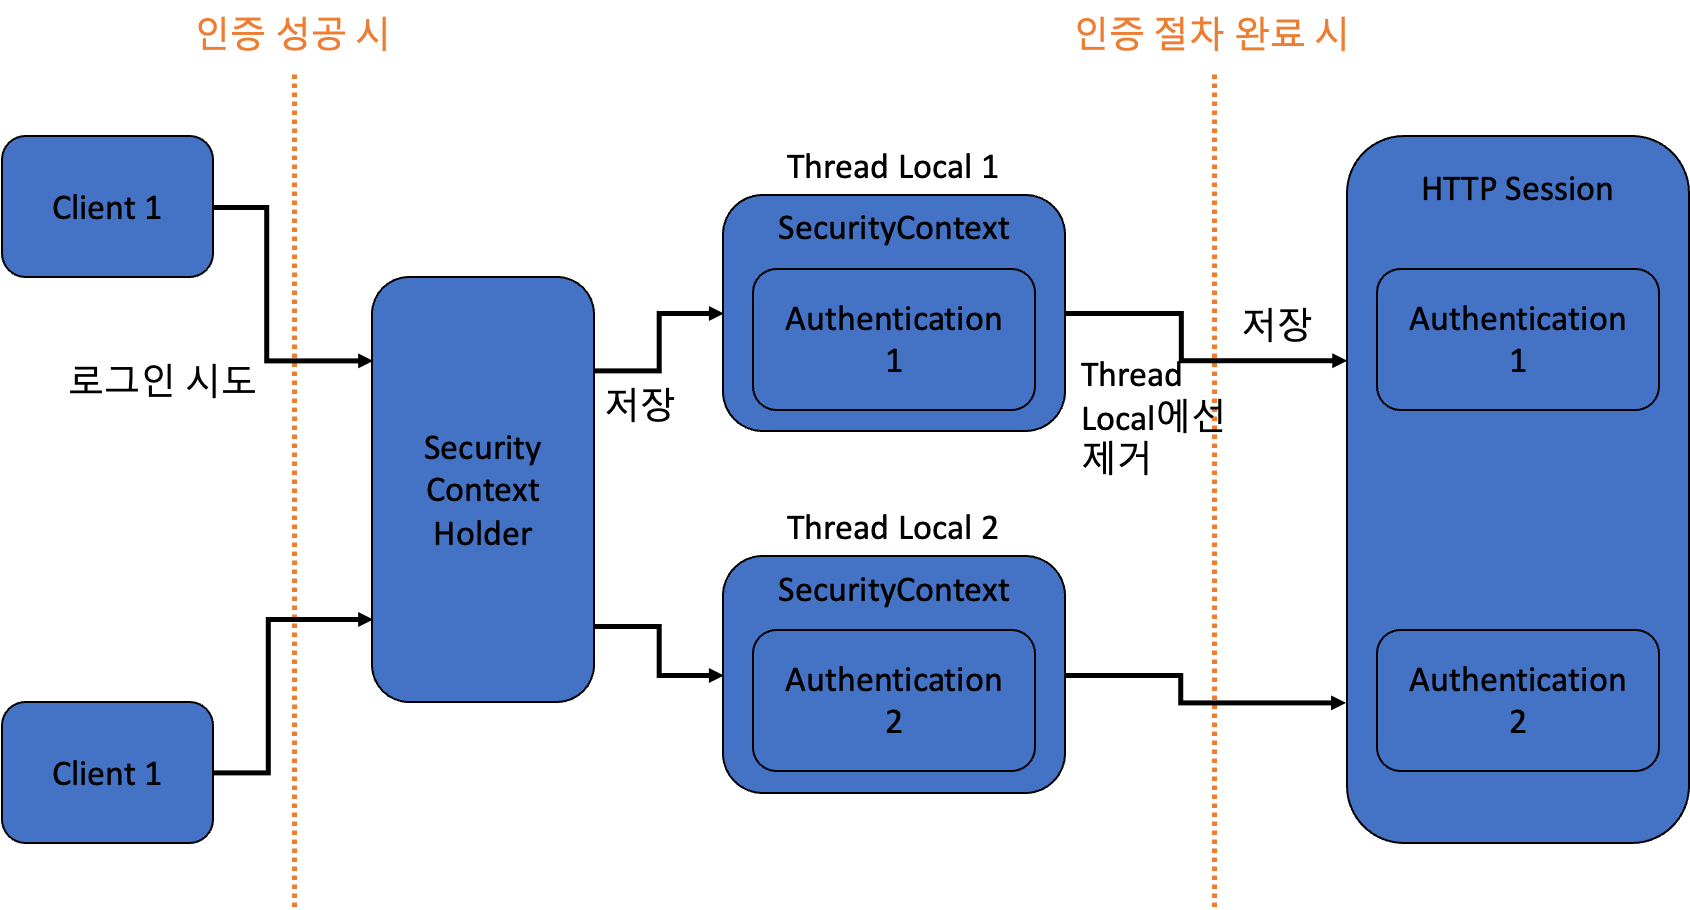
그리고 각 인증 요청 (각 쓰레드) 마다, 서로 다른 Authentication 객체를 갖고 있게 됩니다.
이 Authentication 은 인증 절차가 끝나면, 최종적으로 서버측 세션(HTTP 세션)에 저장되고, Thread Local에서는 제거됩니다.
그리고 이것을 통해서, 인가(Authorization)을 수행할 수 있게 됩니다.
전체적인 Flow는 아래 도표를 참고하면 됩니다.
GrantedAuthority
GrantedAuthority 는 사용자의 권한 정보를 담고 있습니다.
GrantedAuthority 객체는 아래 메서드를 통해서 얻을 수 있습니다.
Authentication.getAuthorities();
이 메서드는 컬렉션으로 관리되는 GrantedAuthority 객체들을 반환합니다.
권한은 일반적으로 ROLE_ADMINISTRATOR 나 ROLE_HR_SUPERVISOR 와 같은 역할을 의미합니다.
이 역할에 따라서 Spring Security가 다르게 동작할 수 있도록 합니다.
Form 기반 (아이디, 패스워드) 인증의 경우, 일반적으로 GrantedAuthority 는 UserDetailsService 에 의해 로드됩니다.
AuthenticationManager
AuthenticationManager 는 필터의 인증(Authentication)을 처리하는 목적의 인터페이스입니다.
‘AuthenticationManager 를 호출한 인증 처리 필터’는 AuthenticationManager 가 인증을 처리하고 반환한 Authentication 을 SecurityContextHolder 에 담습니다.
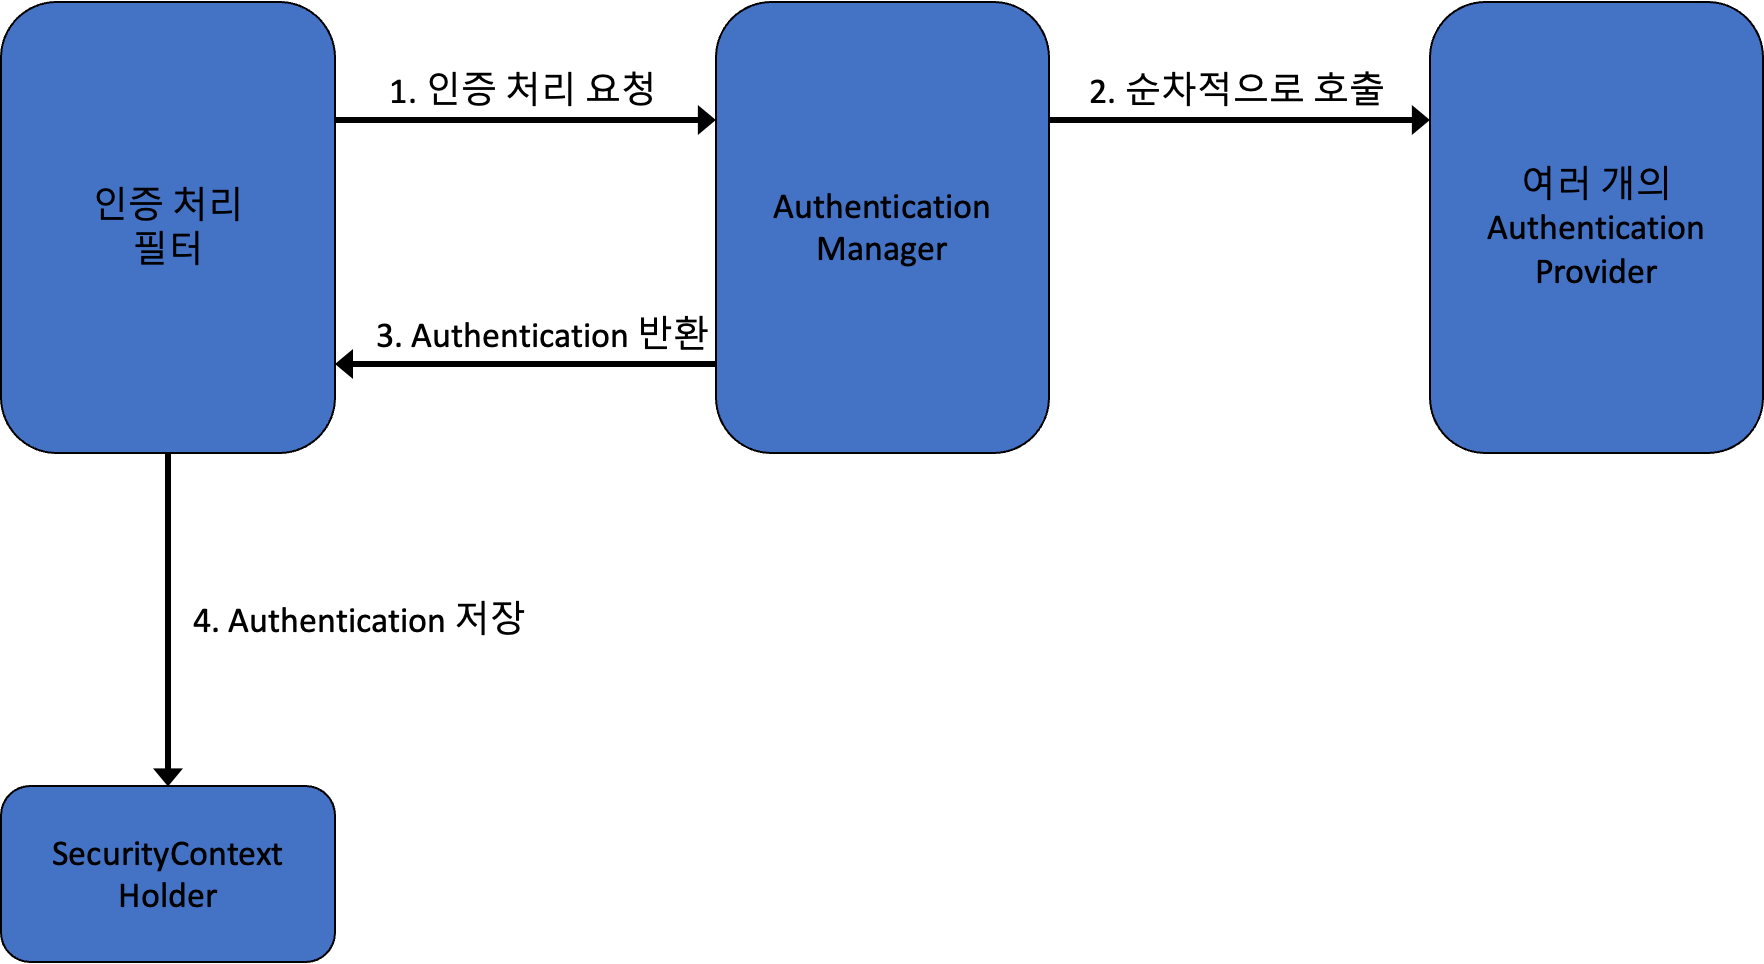
- 먼저 인증 처리를 담당하는 필터가
AuthenticationManager를 호출합니다. AuthenticationManager는 여러 개의AuthenticationProvider를 호출하면서, 인증 처리 작업을 수행합니다.- 인증이 성공했다면,
Authentication을 반환합니다. - 인증 처리 필터가 반환된
Authentication을SecurityContextHolder에게 전달하여, 저장하도록 합니다.
여기에서 등장하는
AuthenticationProvider는 나중에 설명할게요!
아까 AuthenticationManager 는 인터페이스라고 설명했습니다.
그럼 가장 대표적인 구현체 ProviderManager 에 대해 알아볼까요?
ProviderManager 과 AuthenticationProvider
ProviderManager 는 가장 일반적인 AuthenticationManager 구현체입니다.
ProviderManager 는 여러 AuthenticationProvider 를 List 형태로 가지고 있으며, 이 AuthenticationProvider 들을 호출해서 인증 작업을 위임합니다.
특정 AuthenticationProvider 가 가지고 있는 모든 AuthenticationProvider 를 사용했지만 인증이 불가능하거나 실패하는 경우, ProviderNotFoundException 예외를 던집니다.
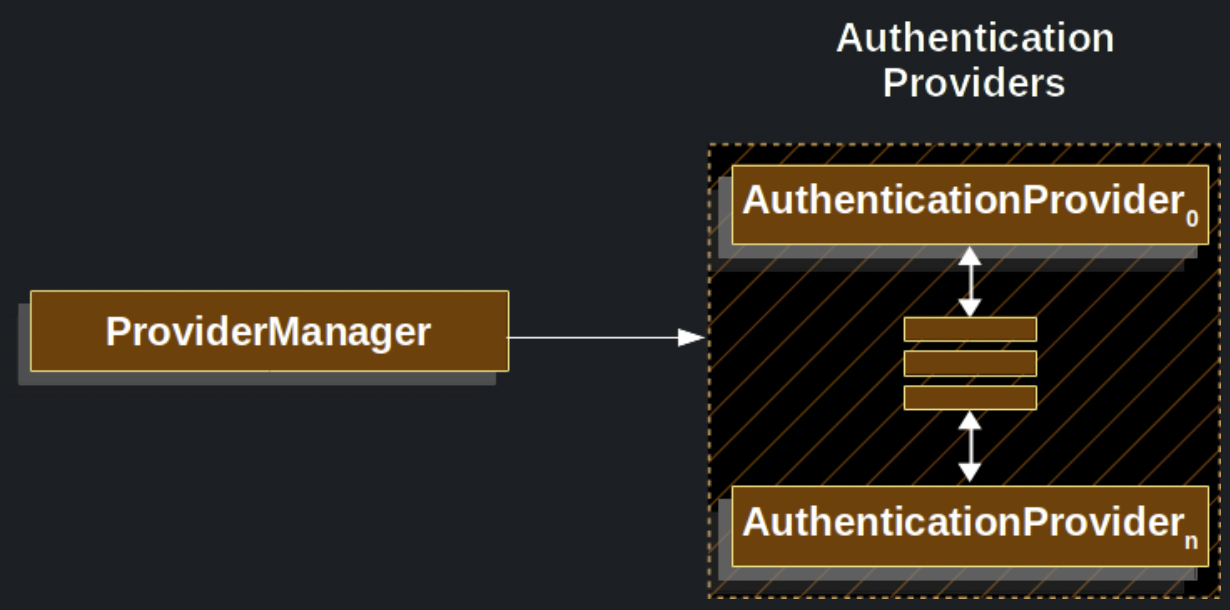
위 그림은 ProviderManager 와 AuthenticationProvider 간의 관계를 나타냅니다.
쉽게 말하자면, 이들의 관계는 아래와 같습니다.
ProviderManager: 일종의 매니저 역할,AuthenticationProvider를 시켜서 인증을 처리한다.AuthenticationProvider: 일종의 일꾼 역할,ProviderManager로부터 호출되고 구체적인 인증 작업을 수행한다.
추가로, 하나의 AuthenticationProvider 는 특정 유형의 인증을 수행합니다.
예를 들어서, AuthenticationProvider A 는 ID/PW 기반 인증을 수행할 수 있고, AuthenticationProvider B 는 SAML 기반 인증을 수행할 수 있습니다.
이를 통해, 하나의 AuthenticationManager 를 가지고 다양한 종류의 인증을 수행할 수 있도록 처리할 수 있습니다.
공통 인증 처리 Manager
만약 하나의 ProviderManager 에서 인증을 처리할 수 없다면, 다른 AuthenticationManager 에게 위임할 수도 있습니다.
ProviderManager 는 아래와 같이, AuthenticationManager 인터페이스를 의존합니다.
그리고 여러 ProviderManager 가 하나의 AuthenticationManager 를 의존할 수도 있습니다.
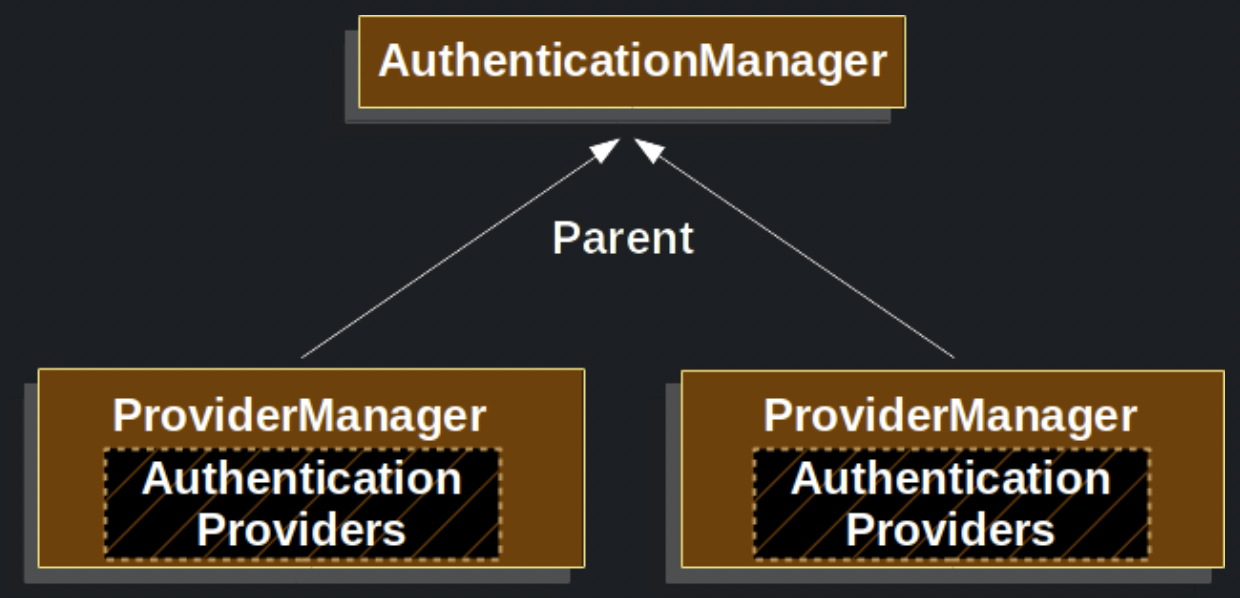
이를 통해, 특정 ProviderManager 에서 인증을 실패했을 때, 또다른 AuthenticationManager 로 인증을 수행할 수 있도록 지원합니다.
또한, 여러 ProviderManager 에서 공통된 인증 로직을 한 곳에 모을 수 있습니다.
ProviderManager 의 민감 정보 제거 기능
ProviderManager 은 인증에 필요한 민감한 정보들 (예를 들어, PW) 을 Authentication 객체에서 지우는 기능까지 제공합니다.
만약 이런 정보가 Authentication 객체에 남아있게 된다면, 서버측 세션에 저장되고 이는 보안상 적절하지 않으므로, 이를 보완할 수 있게 됩니다.
이 기능이 필요하지 않다면, ProviderManager 의 eraseCredentialsAfterAuthentication 속성을 변경해 비활성화할 수 있습니다.
자세한 내용은 JavaDoc 을 참고하세요.
AuthenticationProvider
AuthenticationProvider 에 대해, 좀 더 자세히 알아보겠습니다.
우리는 ProviderManager 에 직접 AuthenticationProvider 를 주입하여, 어떤 인증 방식을 처리할 것인지 설정할 수 있습니다.
그리고 각 AuthenticationProvider 는 특정한 유형의 인증을 수행하게 됩니다.
예를 들어, DaoAuthenticationProvider 를 주입해 ID/PW 기반 인증을 처리하게 하거나, JwtAuthenticationProvider 를 주입해서 JWT 기반 인증을 처리할 수도 있습니다.
AuthenticationEntryPoint 를 활용해, 인증 요청 보내기
AuthenticationEntryPoint 를 사용해서, 클라이언트에게 인증 요청 Http Response를 보낼 수 있습니다.
만약 클라이언트가 이미 인증을 완료한 상태라면, 굳이 인증을 요청하는 Http 응답을 전송할 필요가 없습니다.
하지만 ‘인증되지 않은 클라이언트’가 ‘인증이 필요한 리소스’에 접근한다면, 인증을 요청할 수 있습니다.
이때 AuthenticationEntryPoint 가 사용되며, 이를 통해 ‘로그인 페이지 Redirect’과 같은 HTTP 응답을 보낼 수 있습니다.
AbstractAuthenticationProcessingFilter 와 인증 Flow
이번에는 인증 필터에 대해 알아보겠습니다.
이를 통해 전체적인 흐름에 대해 이해하실 수 있을 것입니다.
먼저 AbstractAuthenticationProcessingFilter 는 인증 처리를 위한 기본 필터입니다.
아래 그림을 통해, AbstractAuthenticationProcessingFilter 가 어떤 작업을 수행하는지 알아보겠습니다.
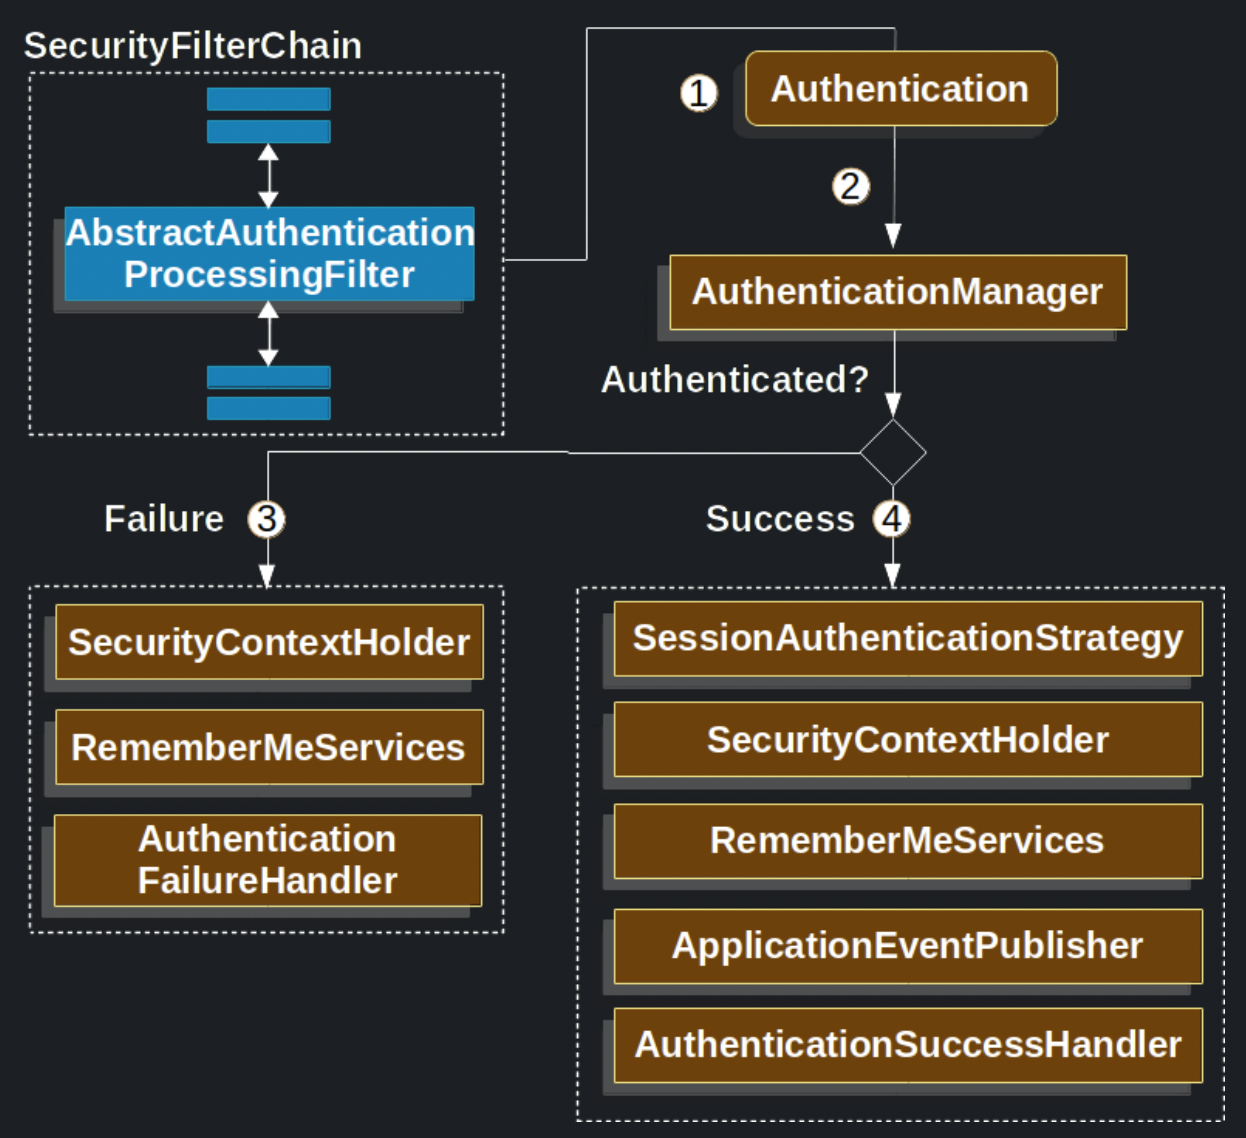
- 사용자가 인증 정보를 제출하면,
AbstractAuthenticationProcessingFilter가Authentication인스턴스를 생성합니다. (전달받은HttpServletRequest인스턴스 활용)- 이때 생성된
Authentication의 타입은AbstractAuthenticationProcessingFilter를 상속받은 하위 클래스에 따라 달라집니다. - 예를 들어,
UsernamePasswordAuthenticationFilter를 사용하면UsernamePasswordAuthenticationToken이라는Authentication인터페이스의 구현체 타입을 생성합니다.
- 이때 생성된
- 필터로부터 생성된
Authentication을AuthenticationManager에게 전달합니다.- 만약
ProviderManager가AuthenticationManager인 경우,AuthenticationProvider를 활용해서 인증 작업을 수행합니다.
- 만약
- 만약 인증에 실패한 경우,
AbstractAuthenticationProcessingFilter는 아래 3가지 작업을 수행합니다.SecurityContextHolder를 비웁니다.- 만약 로그인 유지 기능이 설정되어 있다면,
RememberMeServices.loginFail를 호출합니다. -
AuthenticationFailureHandler를 호출합니다.자세한 것은 이 문서 를 참고하세요.
- 만약 인증에 성공한 경우, 아래 3가지 작업을 수행합니다.
-
인증이 성공했음을
SessionAuthenticationStrategy에게 알립니다.자세한 것은 이 문서 를 참고하세요.
-
Authentication이SecurityContextHolder에 저장됩니다.
그리고나서,SecurityContextPersistenceFilter가SecurityContext를 HttpSession에 저장합니다.
(이를 통해, 인가 작업이 가능해집니다.)자세한 것은 이 문서 를 참고하세요.
- 만약 로그인 유지 기능이 설정되어 있다면,
RememberMeServices.loginSuccess를 호출합니다. ApplicationEventPublisher가InteractiveAuthenticationSuccessEvent를 Publish 합니다.-
AuthenticationSuccessHandler가 호출됩니다.자세한 것은 이 문서 를 참고하세요.
-
정리
이번 포스팅을 통해, Spring Security의 전체적인 인증 구조에 대해 알아봤습니다.
생략된 내용도 꽤 많아, 이 글만으로는 이해가 어려울 수 있습니다.
다른 자료도 참고해서 학습하시면 이해에 있어 큰 도움이 될 것 같습니다.
구조를 알아봤으니, 다음 포스팅에서는 실제로 어떻게 인증을 적용하면 되는지 다루겠습니다.