
이번에는 Spring Security가 지원하는 Authentication 중 하나인, Form Login의 구조에 대해 알아보겠습니다.
Spring Security는 HTML form 태그를 사용한 ID/PW 기반 인증을 지원합니다.
그럼 본격적으로 Form Login이 동작하는 구조에 대해 알아볼까요?
로그인 페이지로 Redirect
‘인증되지 않은 사용자’가 ‘인증이 필요한 리소스’에 접근할 때, Spring Security는 로그인 페이지로 Redirect 해줍니다.
먼저 이것이 어떻게 이루어지는지 살펴보겠습니다.
절차
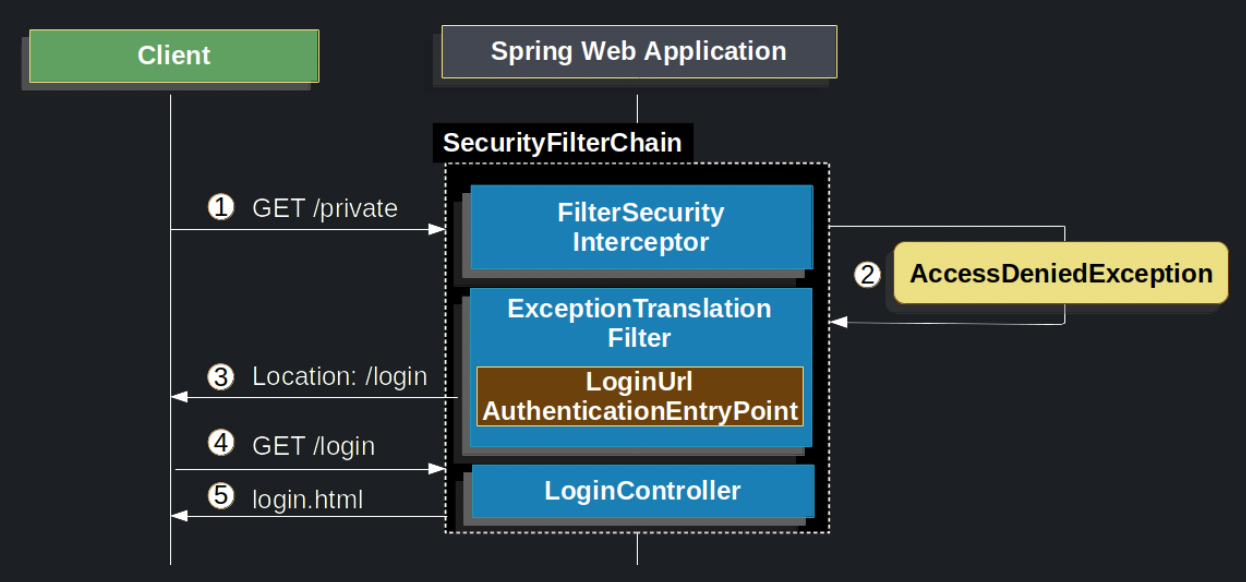
- ‘인증되지 않은 사용자’가 ‘인증이 필요한 리소스’를 요청합니다.
-
FilterChainProxy가 이 요청을 처리할SecurityFilterChain을 호출합니다.
그리고 해당SecurityFilterChain에 속한FilterSecurityInterceptor라는 필터가 가장 먼저 실행됩니다.
이 필터에 의해AccessDeniedException예외가 던져집니다.FilterChainProxy와SecurityFilterChain에 대해서는 이전 게시글에서 설명했습니다.
필요하다면 이 게시글을 참고하세요! -
던져진
AccessDeniedException예외가ExceptionTranslationFilter에 의해 catch 됩니다.
그리고 관련된AuthenticationEntryPoint를 사용해서 클라이언트를 Redirect 시킵니다. 이때 사용되는AuthenticationEntryPoint의 구현체는LoginUrlAuthenticationEntryPoint입니다.ExceptionTranslationFilter와AuthenticationEntryPoint는 이 게시글을 참고하세요. - 클라이언트 브라우저는 전달받은 URL로 Redirect 됩니다.
- 서버가 로그인 페이지에 필요한 리소스를 전달합니다.
여기까지가 Redirect 되는 절차에 대한 설명입니다.
이번에는 실제로 클라이언트가 인증을 요청했을 경우에 대해 알아봅시다.
인증 정보 검증
ID/PW 가 클라이언트로부터 전달되면, UsernamePasswordAuthenticationFilter 가 이를 검증합니다.
참고로, UsernamePasswordAuthenticaionFilter 는 AbstractAuthenticationProcessingFilter 를 상속받습니다.
아래 그림을 보면서, 자세히 알아보겠습니다.
절차
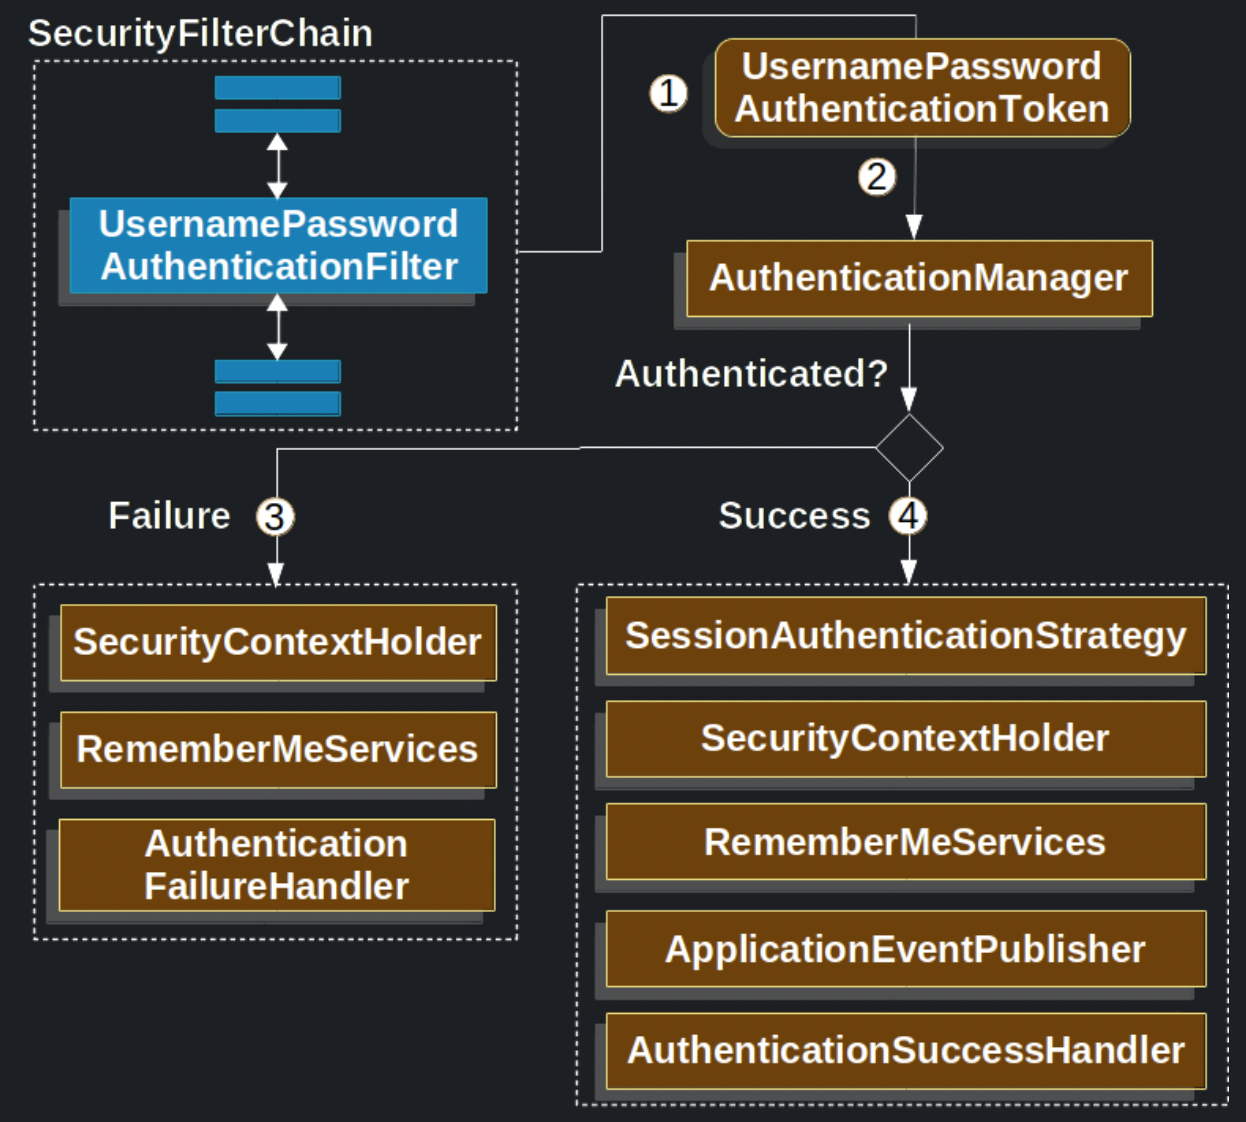
- 먼저 사용자가 ID와 PW를 전송하면,
UsernamePasswordAuthenticationFilter라는 필터가 전달받은HttpServletRequest객체로부터 ID와 PW 값을 가져와,UserPasswordAuthenticationToken인스턴스를 생성합니다.
이UserPasswordAuthenticationToken은Authentication인터페이스의 구현체입니다. -
그리고 생성된
UsernamePasswordAuthenticationToken은AuthenticationManager에게 전달받고, 인증 작업을 수행합니다.AuthenticationManager는 이 포스팅을 참고하세요. - 만약 인증에 실패했다면 아래 절차를 수행합니다.
-
SecurityContextHolder를 비웁니다. (Thread Local로 관리되던 인증 정보 제거)SecurityContextHolder는 이 게시글을 참고하세요. RememberMeServices.loginFail을 실행합니다.
만약 Remember Me 기능을 사용하지 않는다면, 이 절차는 생략합니다.AuthenticationFailureHandler를 호출합니다.
-
- 만약 인증에 성공했다면 아래 절차를 수행합니다.
SessionAuthenticationStrategy에게 새로운 로그인 사실을 알립니다.- 인증정보를 담고 있는
Authentication객체가SecurityContextHolder에 저장됩니다. RememberMeServices.loginSuccess를 호출합니다.
역시 Remember Me 기능을 사용하지 않는다면, 이 절차는 생략합니다.-
ApplicationEventPublisher가InteractiveAuthenticationSuccessEvent를 publish 합니다.ApplicationEventPublisher는 Spring 에서 지원하는 이벤트 처리 기능을 수행합니다.
자세한 것은 JavaDoc을 참고하세요. -
마지막으로
AuthenticationSuccessHandler가 호출됩니다.
보통SimpleUrlAuthenticationSuccessHandler가 이 역할을 수행하며, 다시 원래 요청으로 Redirect합니다.‘인증되지 않은 사용자’가 ‘인증이 필요한 리소스’를 요청했을 때, 로그인 페이지로 Redirect 되면서 저장된 요청 정보 활용
정리
지금까지 Spring Security가 지원하는 인증 기능 중 하나인, Form 인증의 구조에 대해 알아봤습니다.
이전에 다뤘던 내용들과 더불어 설명이 진행되다보니, 설명에 어려움이 많았습니다.
다음에는 어떻게 Form 인증을 적용하면 되는지, 실제 데모 프로젝트를 통해 알아보겠습니다.